What you’ll need:
Any Kommo plan (Base, Advanced, Pro, Enterprise, or 14-day trial).
Admin access in Kommo.
Keep in mind:
You can set up availability both for the whole team and for each user.
To get the most out of bookings in Kommo, make sure to set up the following:
To learn more about the booking feature and how to manage the booking page, read our related articles.
Set up a booking type
Before you start working with bookings in Kommo, set up booking types first. You can create booking types with their own duration, responsible user, and buffer time between bookings.
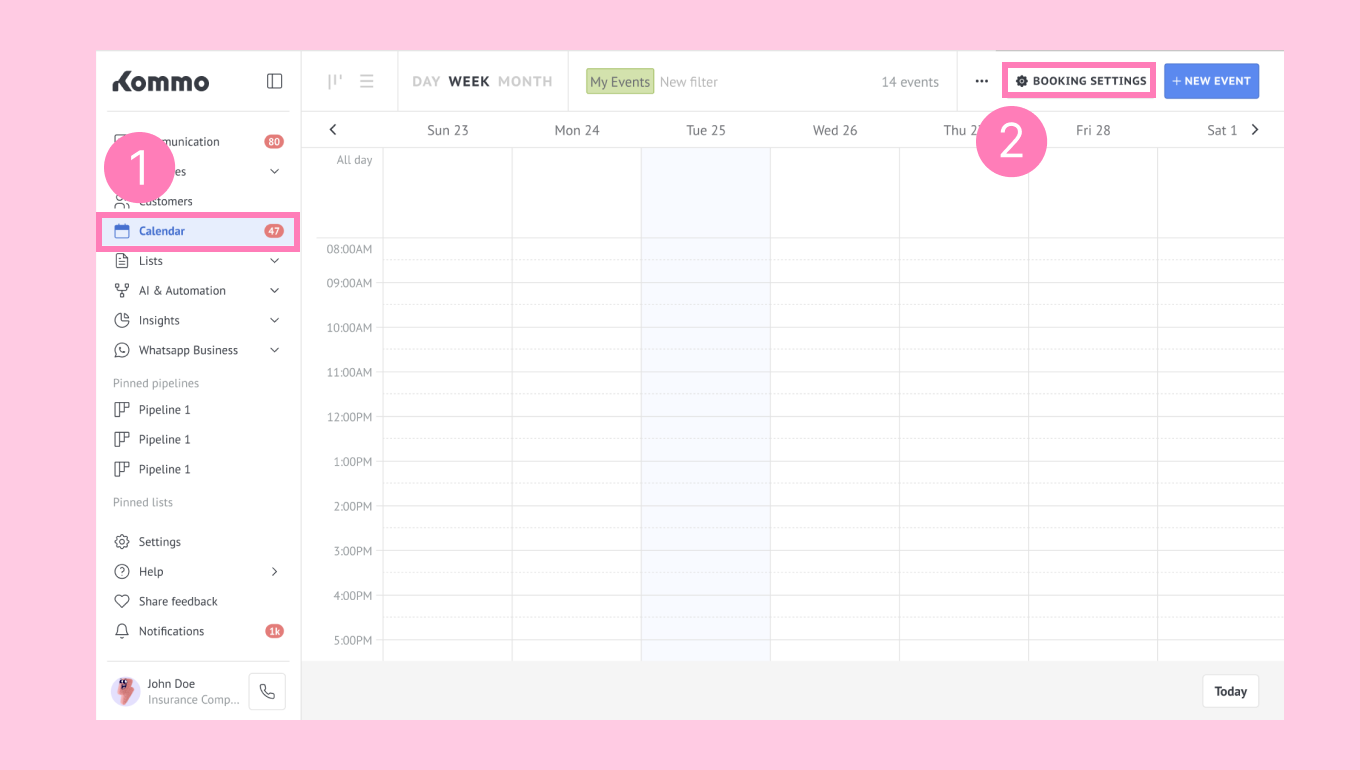
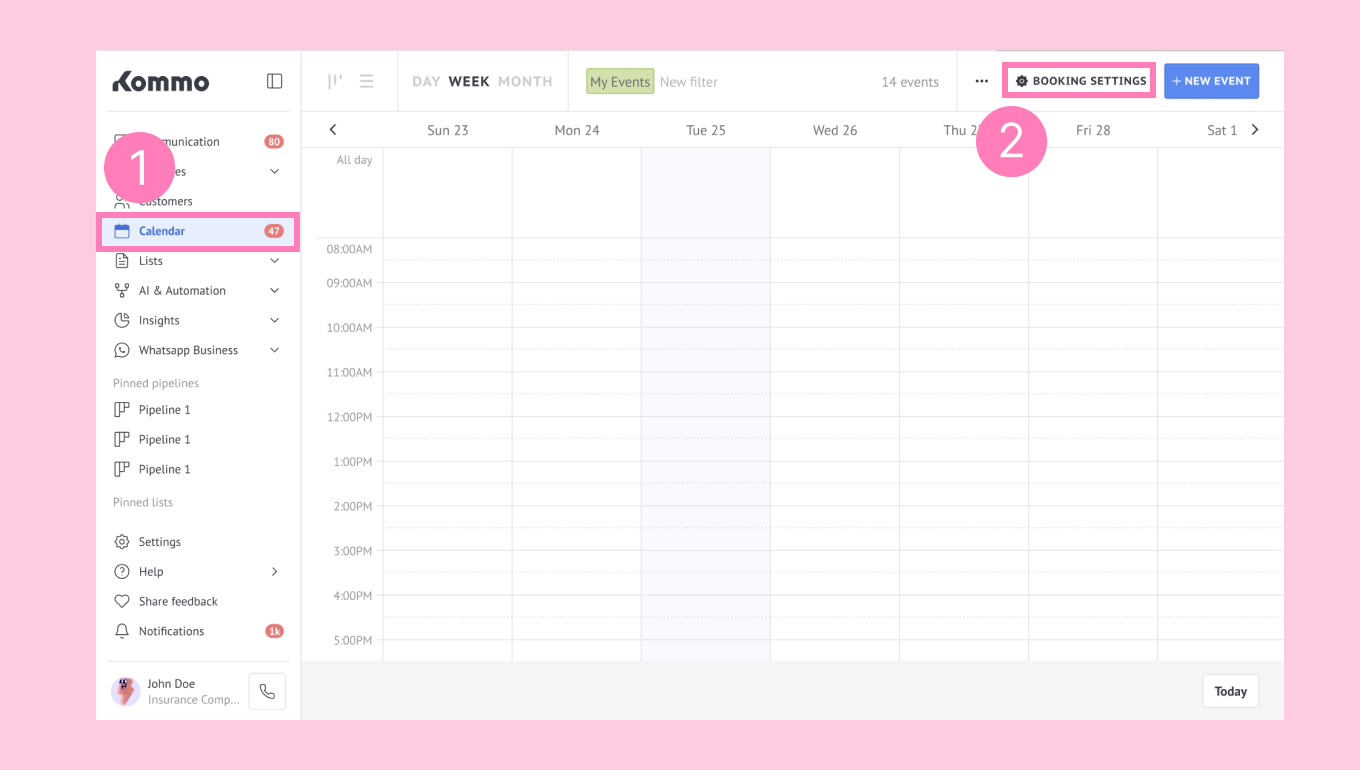
Go to Calendar in the left menu. Click Booking settings in the top-right corner.
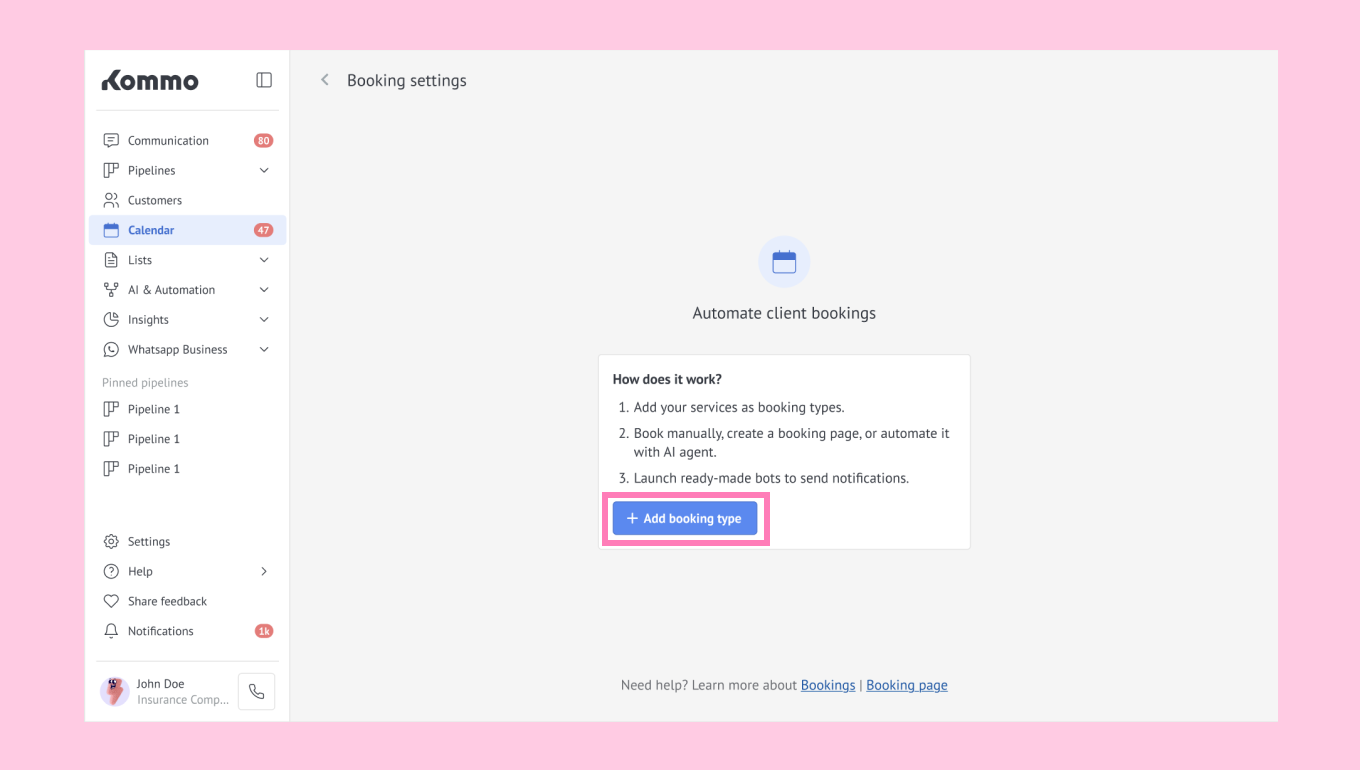
A new page will open. Here, you can start working with Kommo bookings by setting up your first booking type.
On the starting page, click + Add booking type.
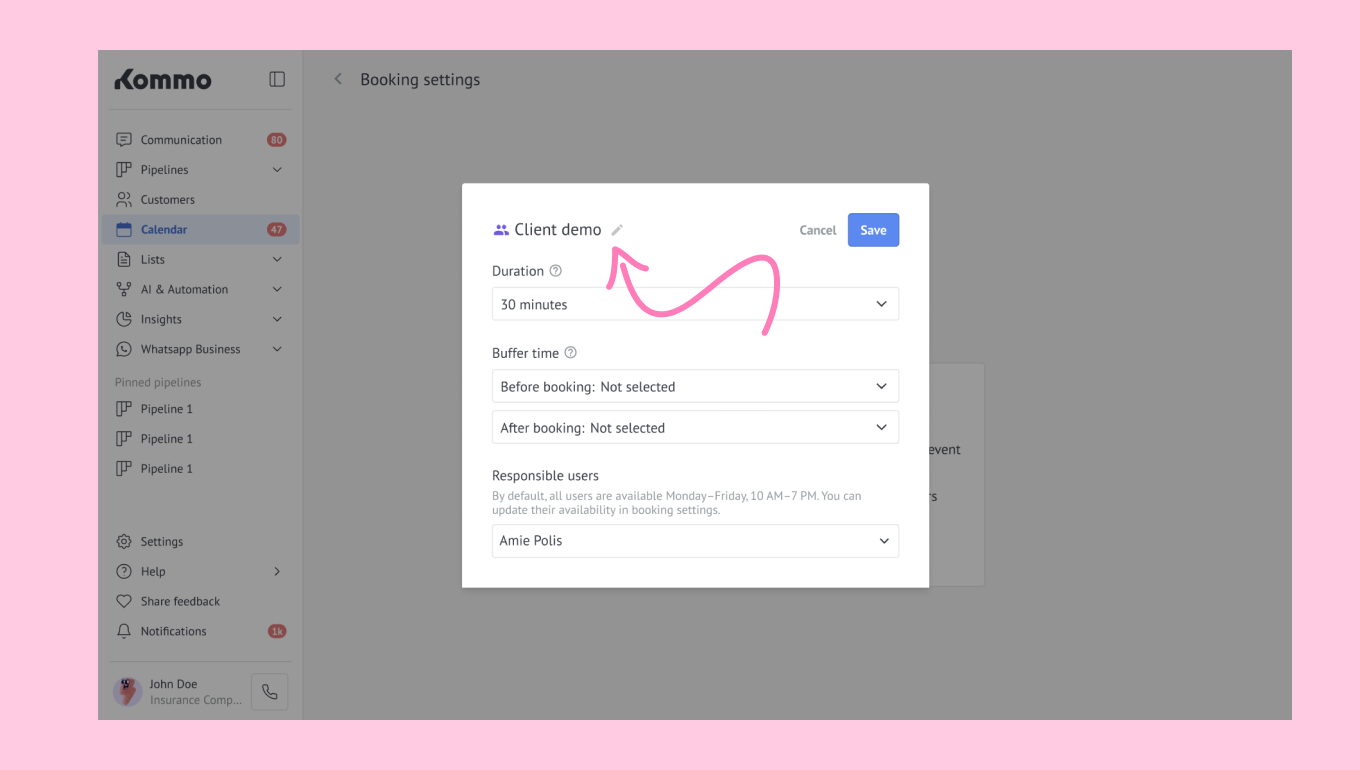
Click the pencil icon and enter the name.
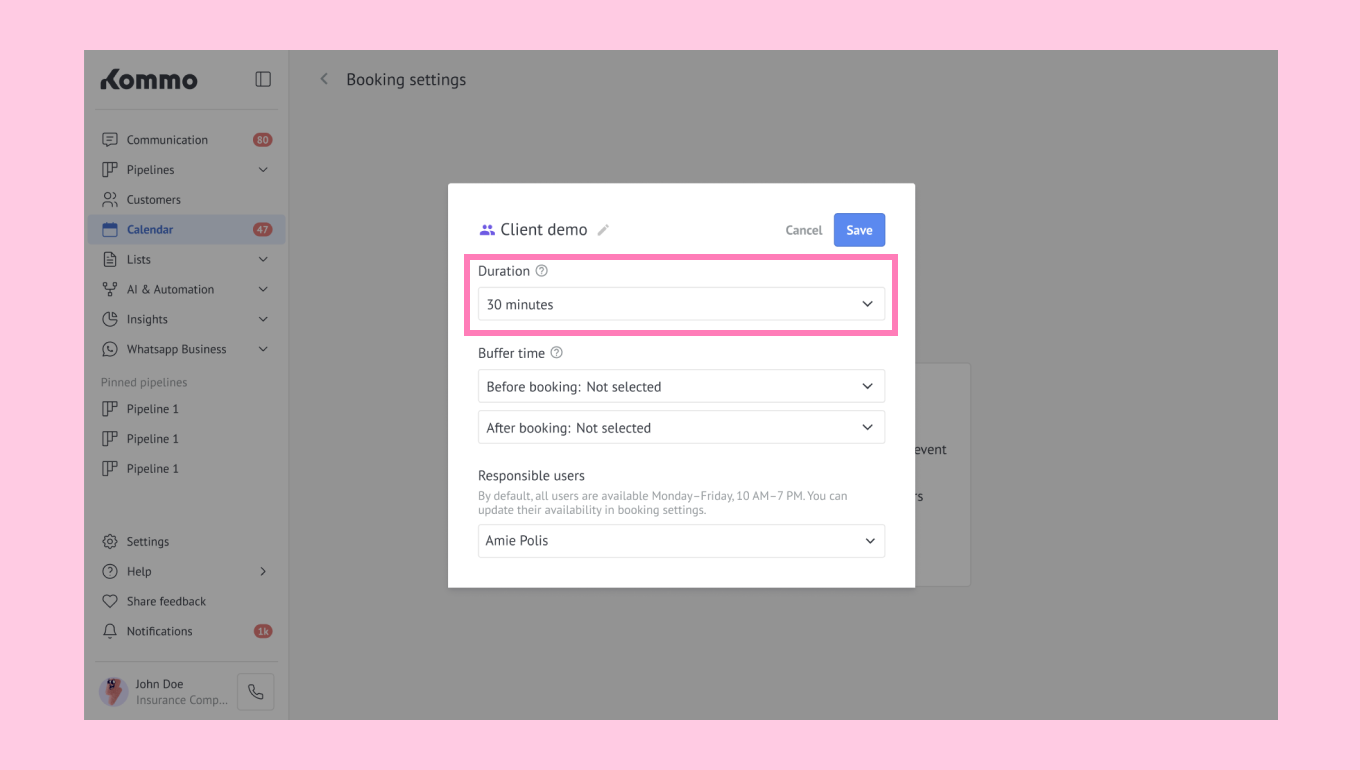
Define the booking duration. To do so, click the Duration dropdown. Select one of the options (15 mins, 30 mins, 1 hour, 2 hours)
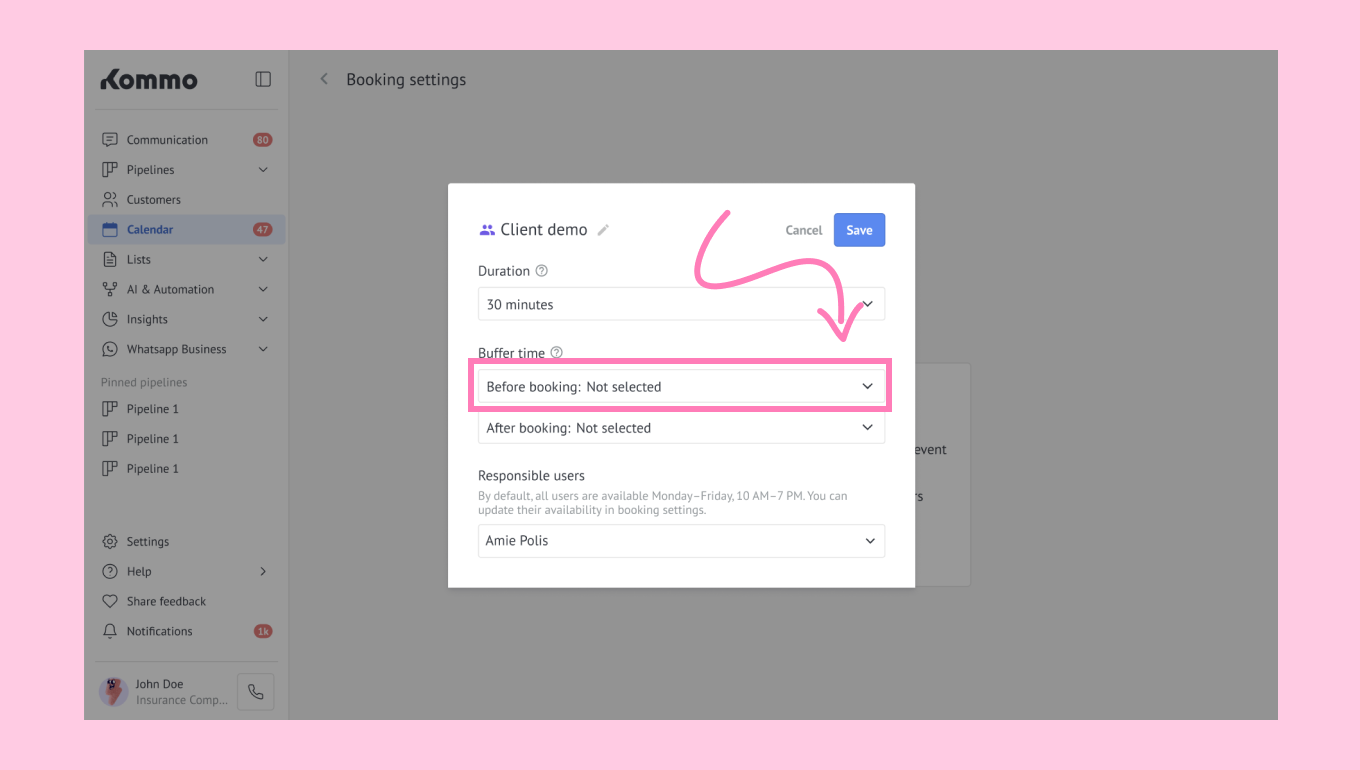
Define the Buffer time.
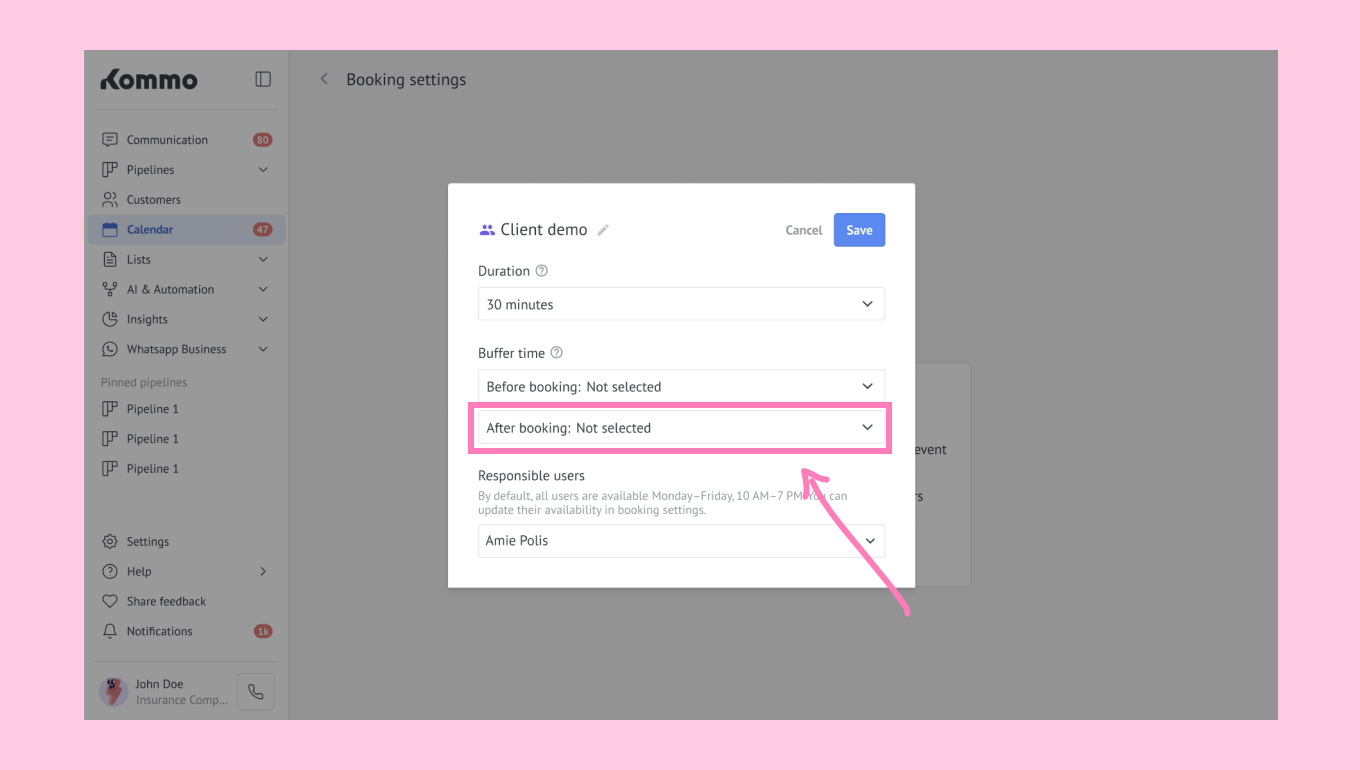
Buffer time is extra time added before or after each booking to prevent back-to-back appointments. It gives the responsible user a short break to wrap up and prepare for the next booking.
Click the Before booking dropdown. → Select an option.
Click the After booking dropdown. → Select an option.
Click the Responsible user dropdown. → Select a user.
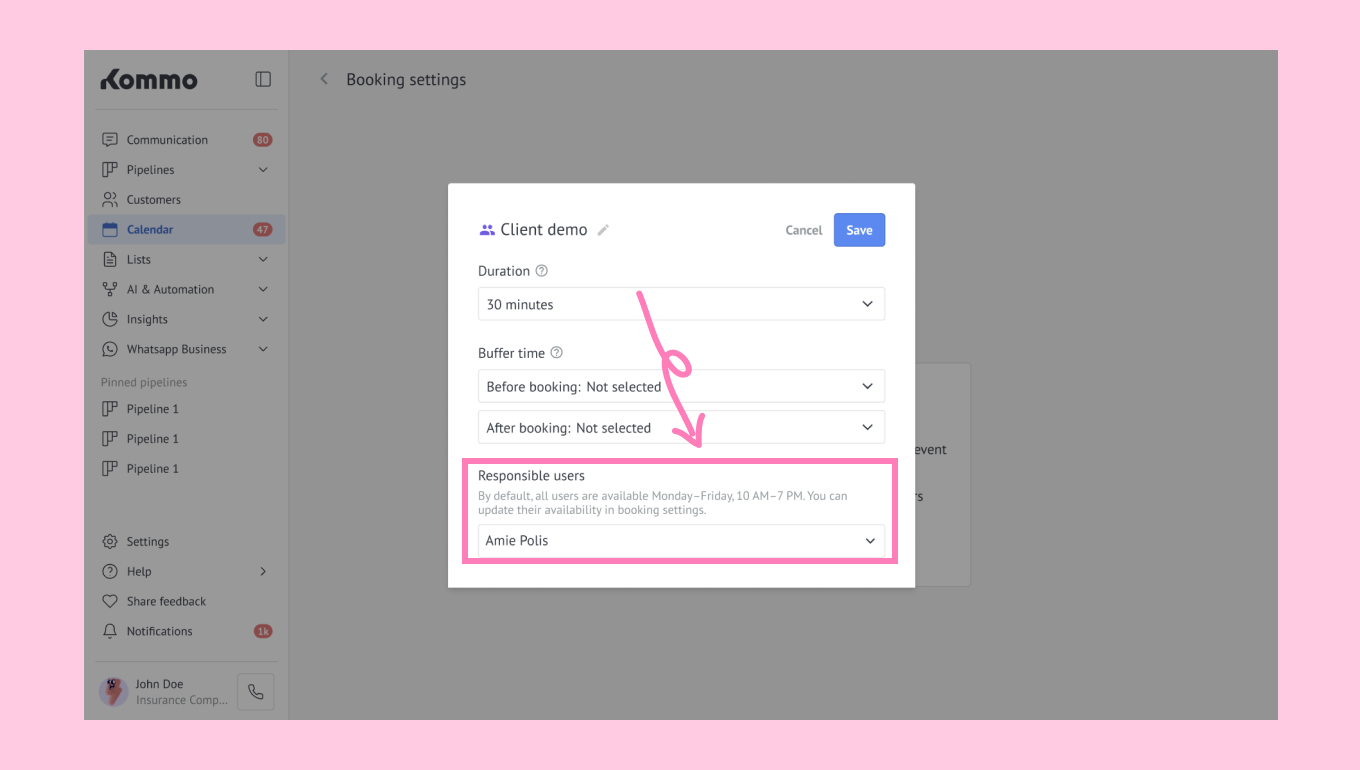
Note: You can click Settings to check and configure the responsible user’s availability.
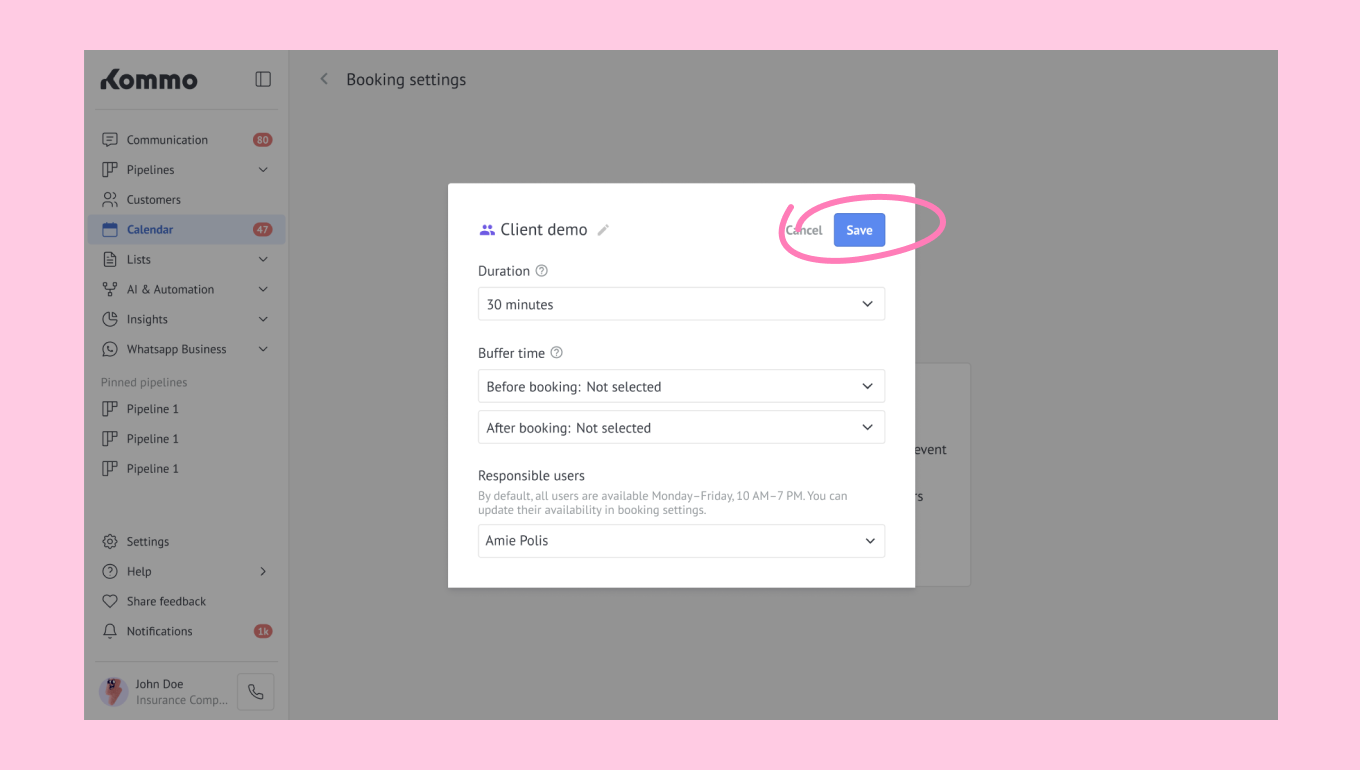
Click Save to apply all settings.
Learn how to create, reschedule, and cancel bookings in our Manage bookings in Kommo article.
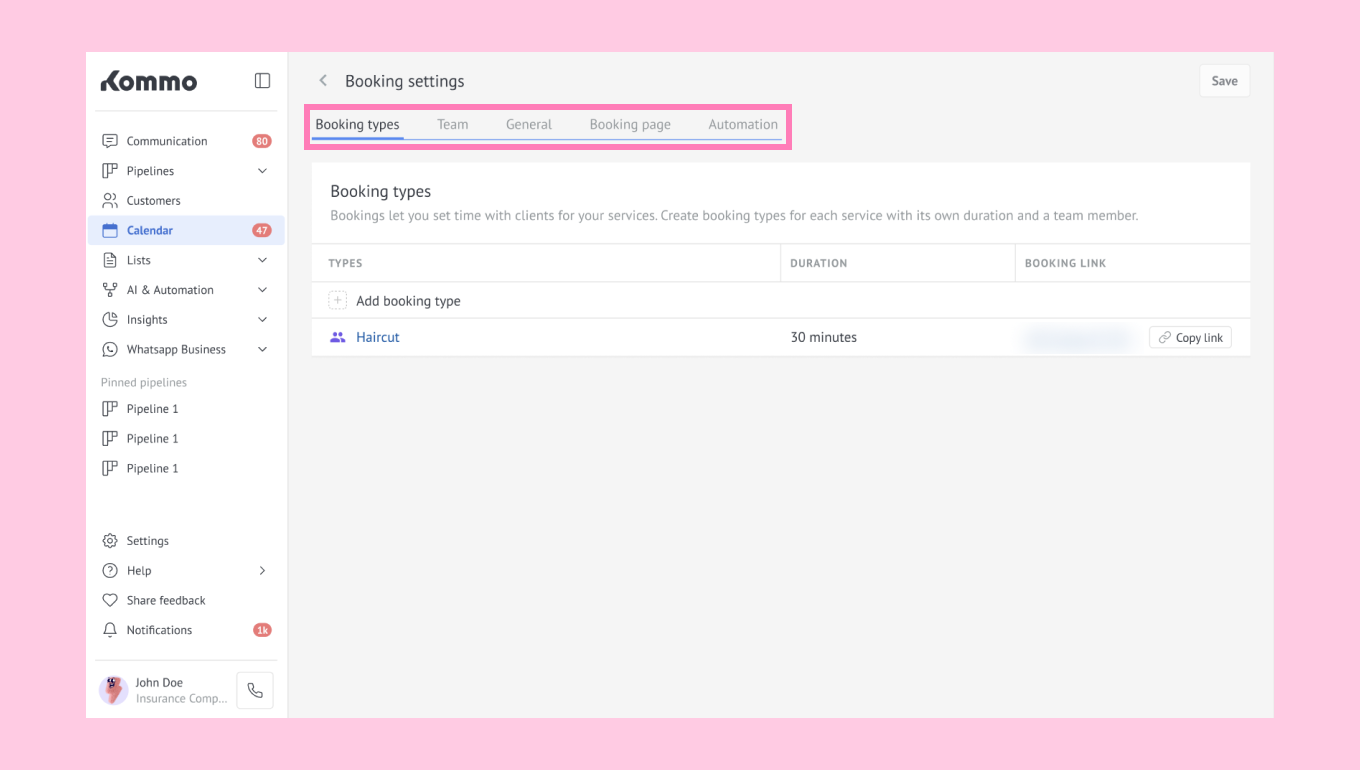
After you set up your first booking type, the following tabs become available:
Booking types — add new booking types and manage existing ones.
Team — manage each team member’s schedule.
General — set up team holiday periods.
Booking page — manage booking page links and settings.
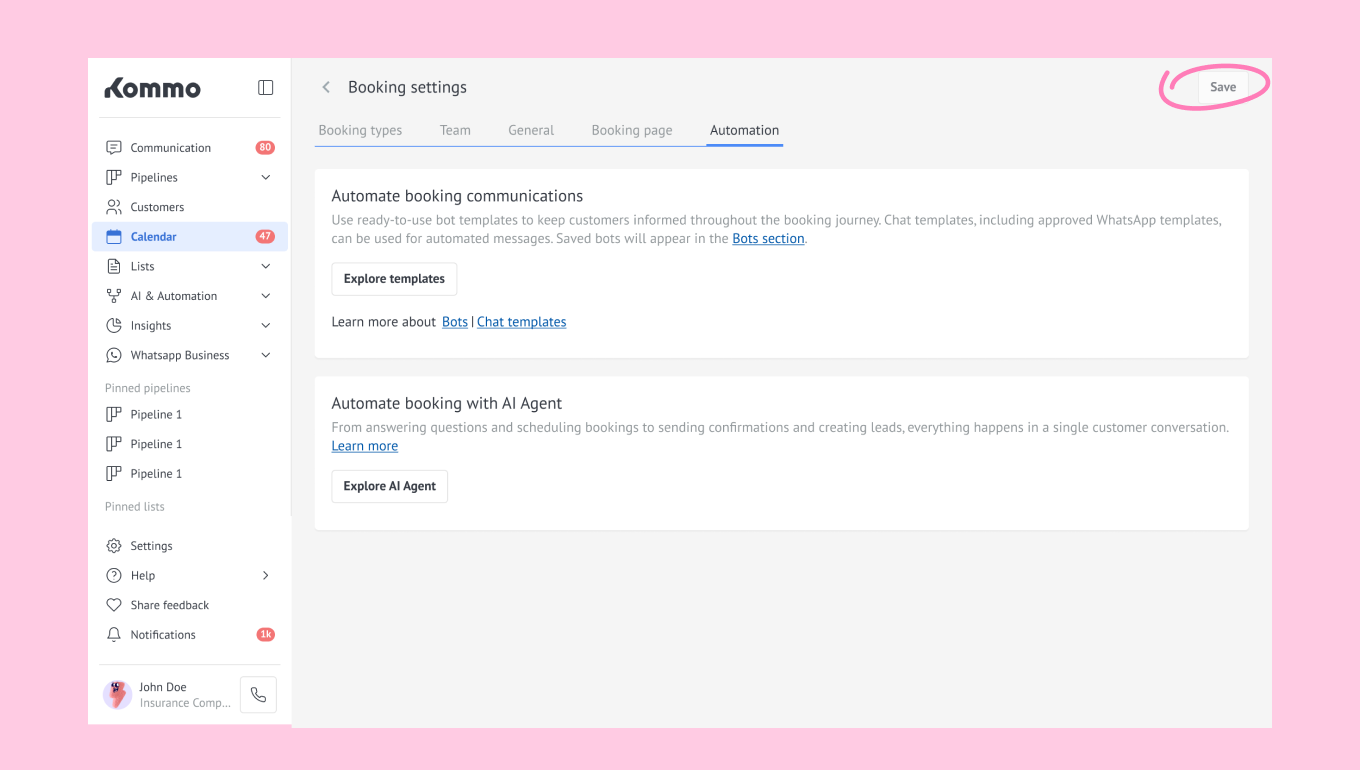
Automation — set up Salesbot and AI agent for booking management.
Set team member availability
Next, you can set your team members’ availability by defining working hours and blocking unavailable times, so bookings can’t be made during those periods.
By default, Kommo sets availability from 10:00 to 19:00, or 10 am to 7 pm depending on your workspace’s time format, Monday through Friday. You can adjust these hours to match each team member’s actual schedule.
Step 1: Set working hours
Click Calendar in the left menu. Then click Booking settings in the top-right corner.
Go to the Team tab.
Here, you can see:
Responsible users
Booking types
Availability
Online booking status
Booking links
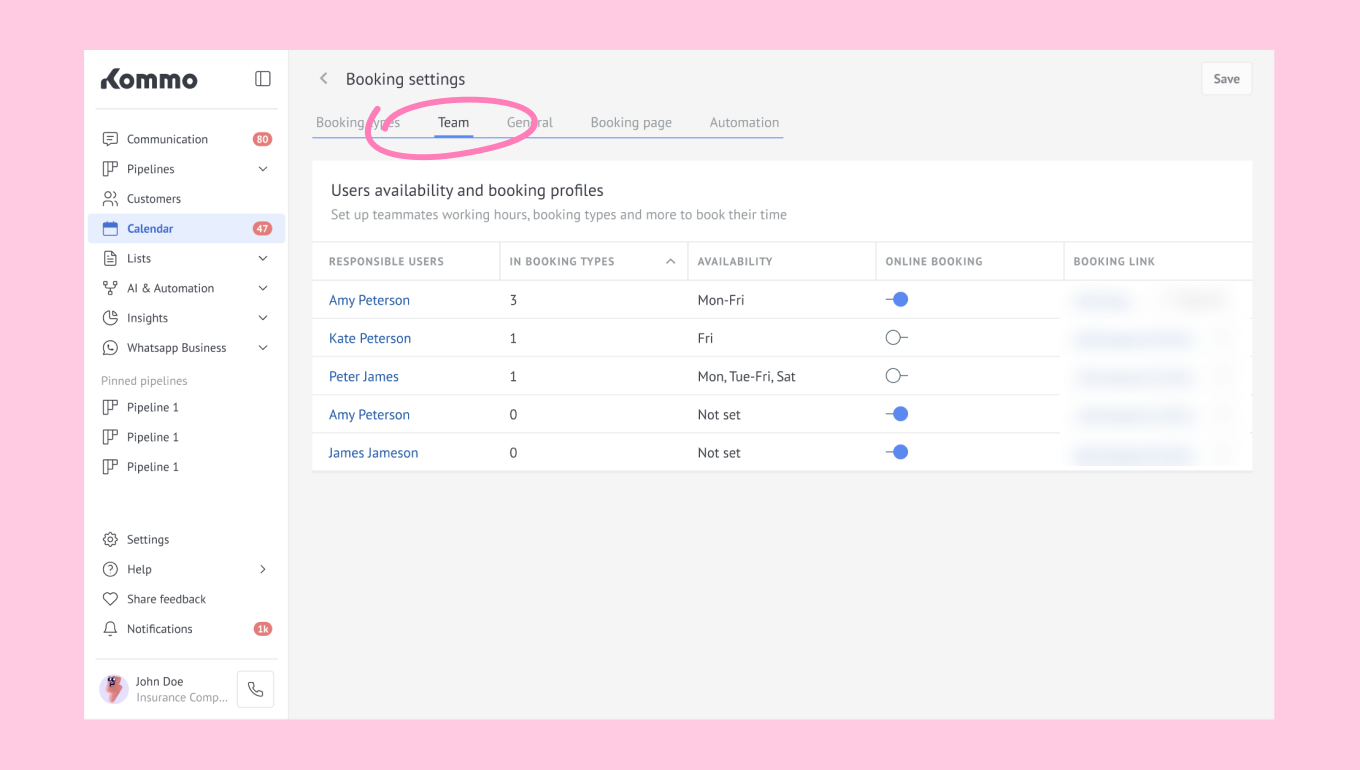
Important: Use the toggle in the Online booking column to choose whether a team member appears on the booking page.
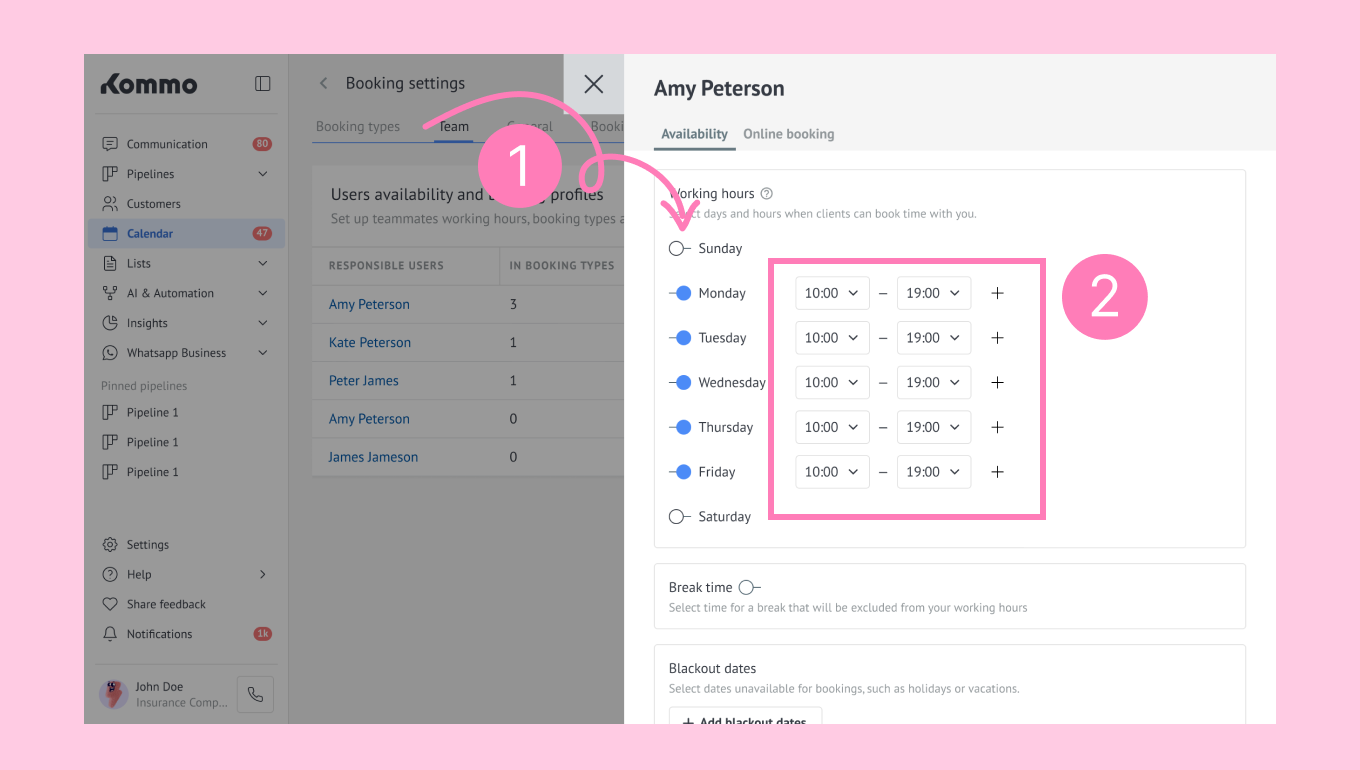
Click the name of a team member whose schedule you want to configure. Their individual schedule will appear.
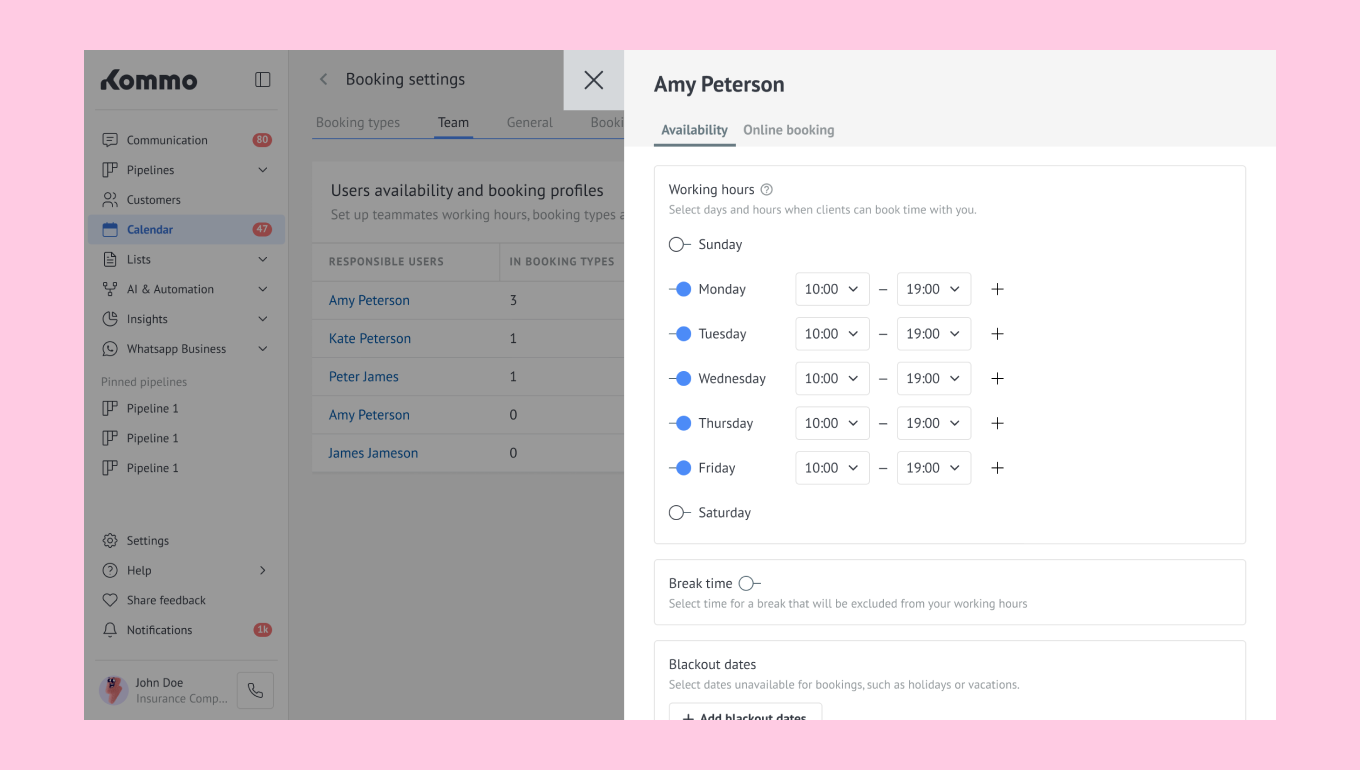
On the Availability tab, toggle the switcher next to the days when this team member is available. Define the time range for each day.
Step 2. Add multiple working intervals (if needed)
If a team member’s working hours vary, you can create multiple time intervals for the same day.
This can be done for each day of the week. For example: Tuesday: 10:00–15:00, 17:00–19:00; Friday: 12:00–14:00, 18:00–22:00.
To set it up, follow these steps:
Click + next to the day you want to edit.
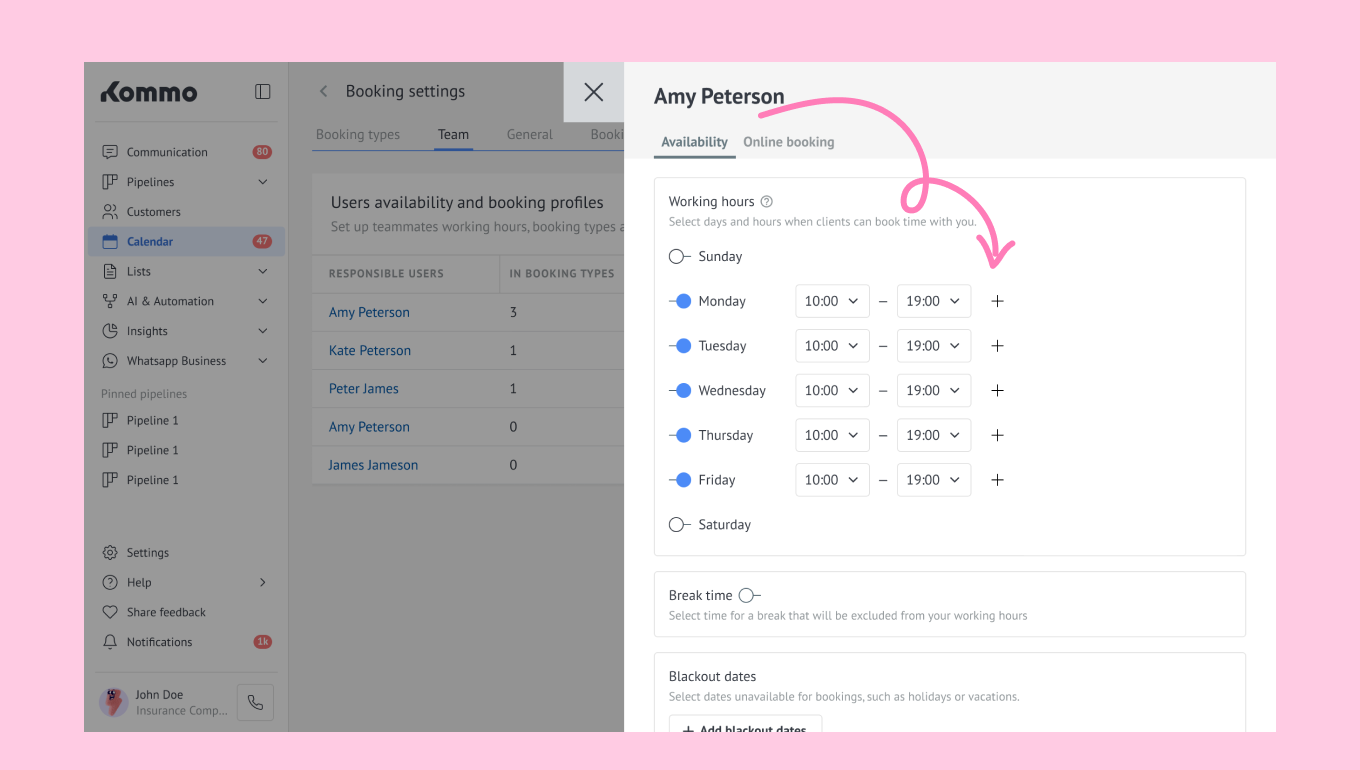
Note: In these examples, time is shown in a 24-hour format. The availability format depends on your workspace settings.
Define the time range for the new interval.
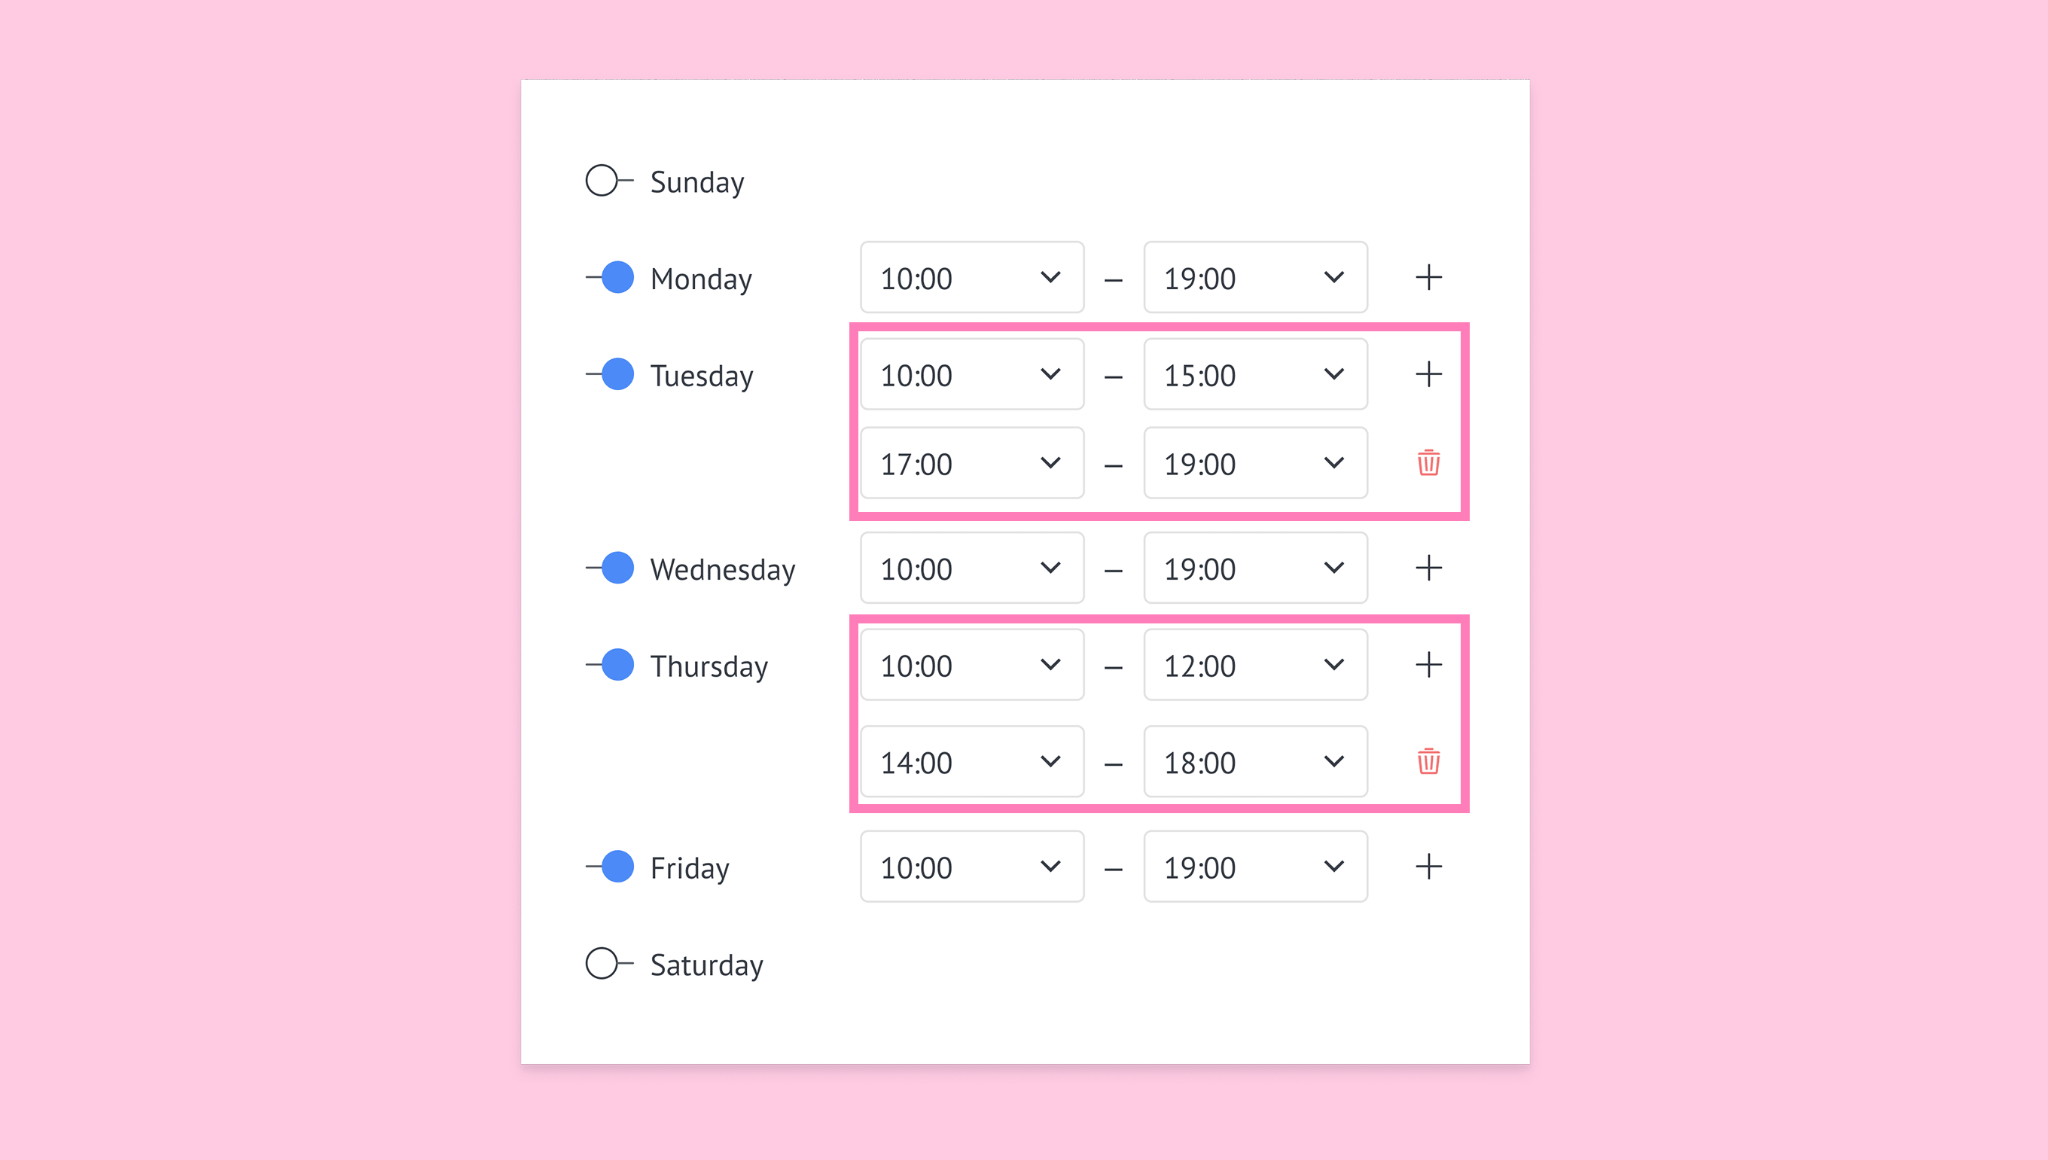
Note: To remove an interval, click the trash bin icon next to it.
Step 3. Add break times and blackout dates
Limits define rules that restrict bookings during specific periods. You can easily set them for each team member, for example, when they are on vacation or have a day off.
To set up individual limits for a team member:
Toggle the Break time switcher to set up the time range that will be excluded from this team member’s working hours
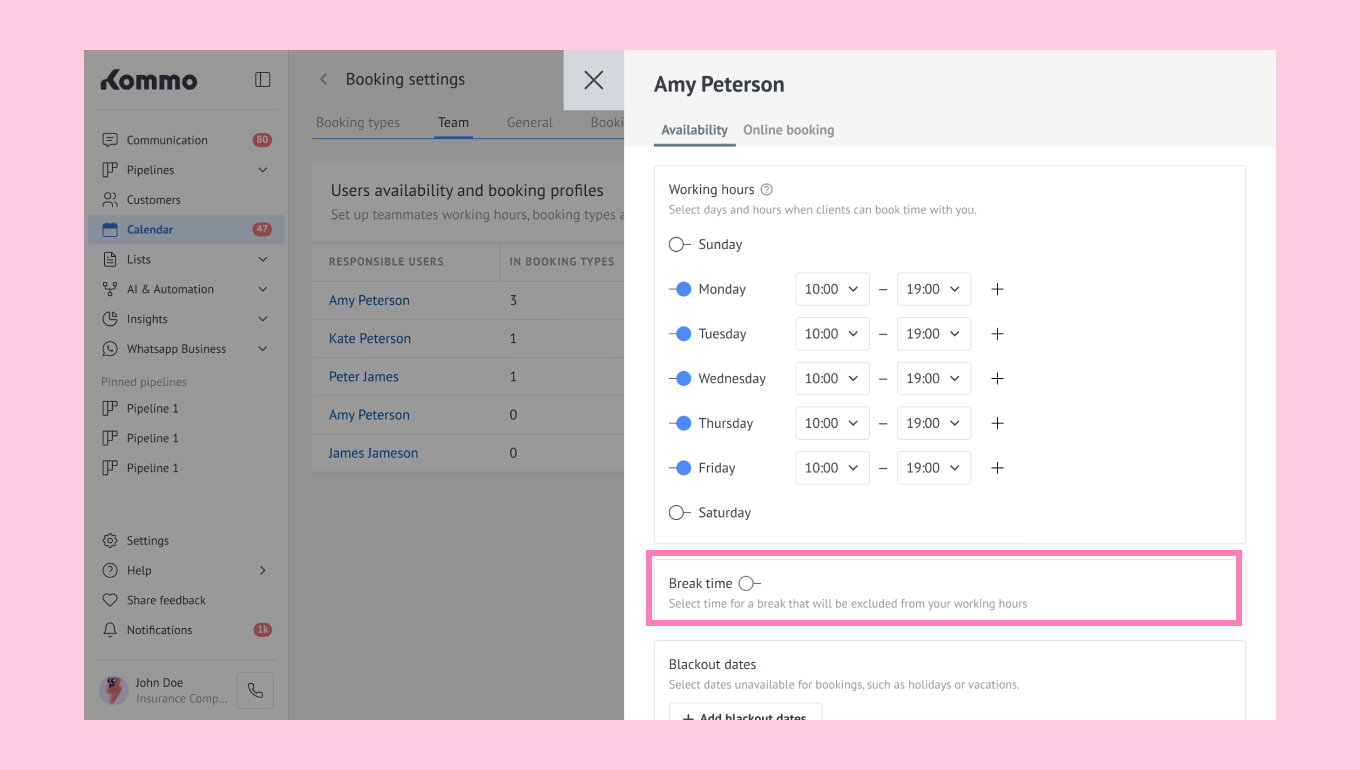
Click + Add blackout dates to select the dates when this user will not be available (vacations and holidays).
Note: You can delete the time range by clicking the trash bin icon.
Configure team-wide booking availability
You can block bookings for the whole team at once, for example during holidays or other company-wide days off. On top of that, you can set rules for how far in advance and how soon clients can book appointments.
Step 1: Add company blackout dates
You can block specific days or longer periods for vacations and holidays.
Go to Booking settings → General → Blackout dates. Click + Add blackout dates.
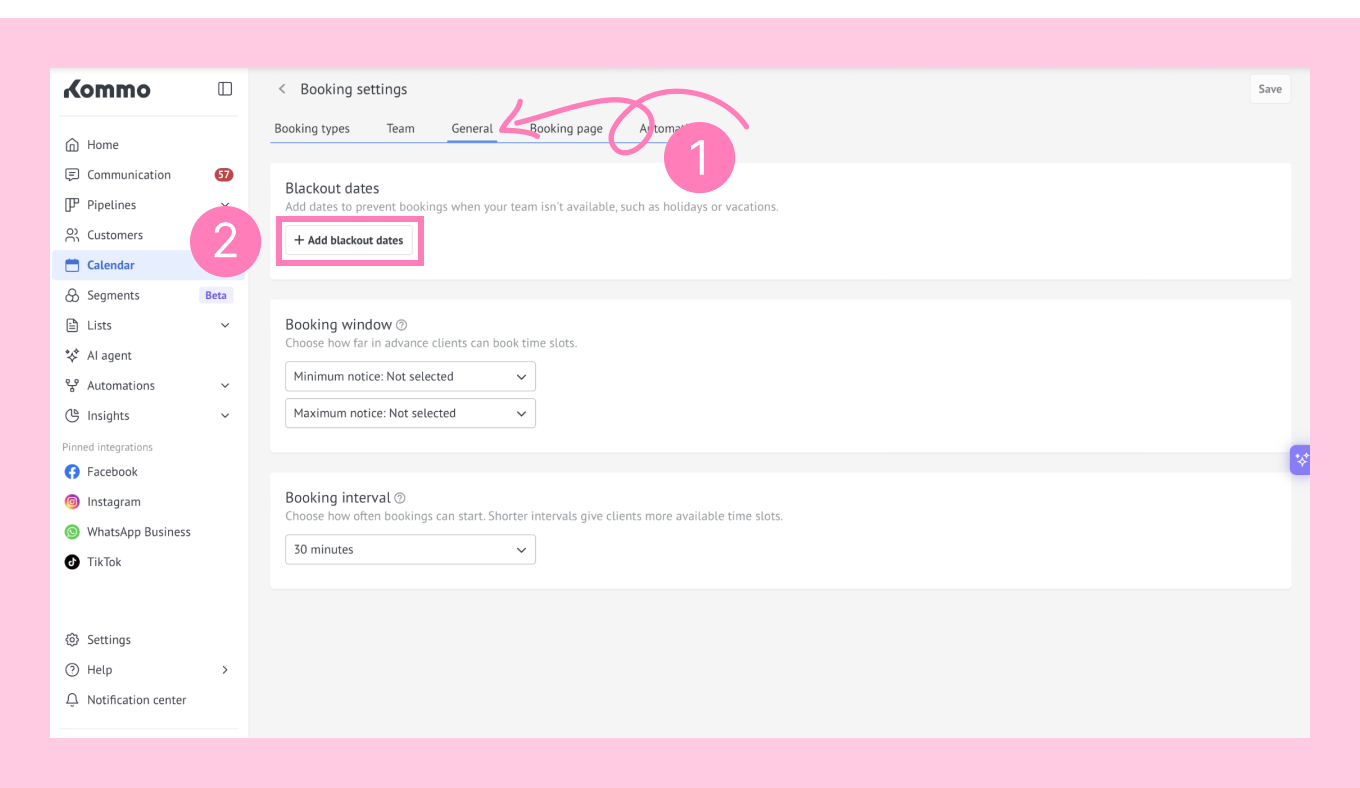
Select the dates when you’re unavailable. Click Done.
Step 2: Set minimum and maximum booking notice
Booking notice is the minimum or maximum advance time required for a client to schedule an appointment.
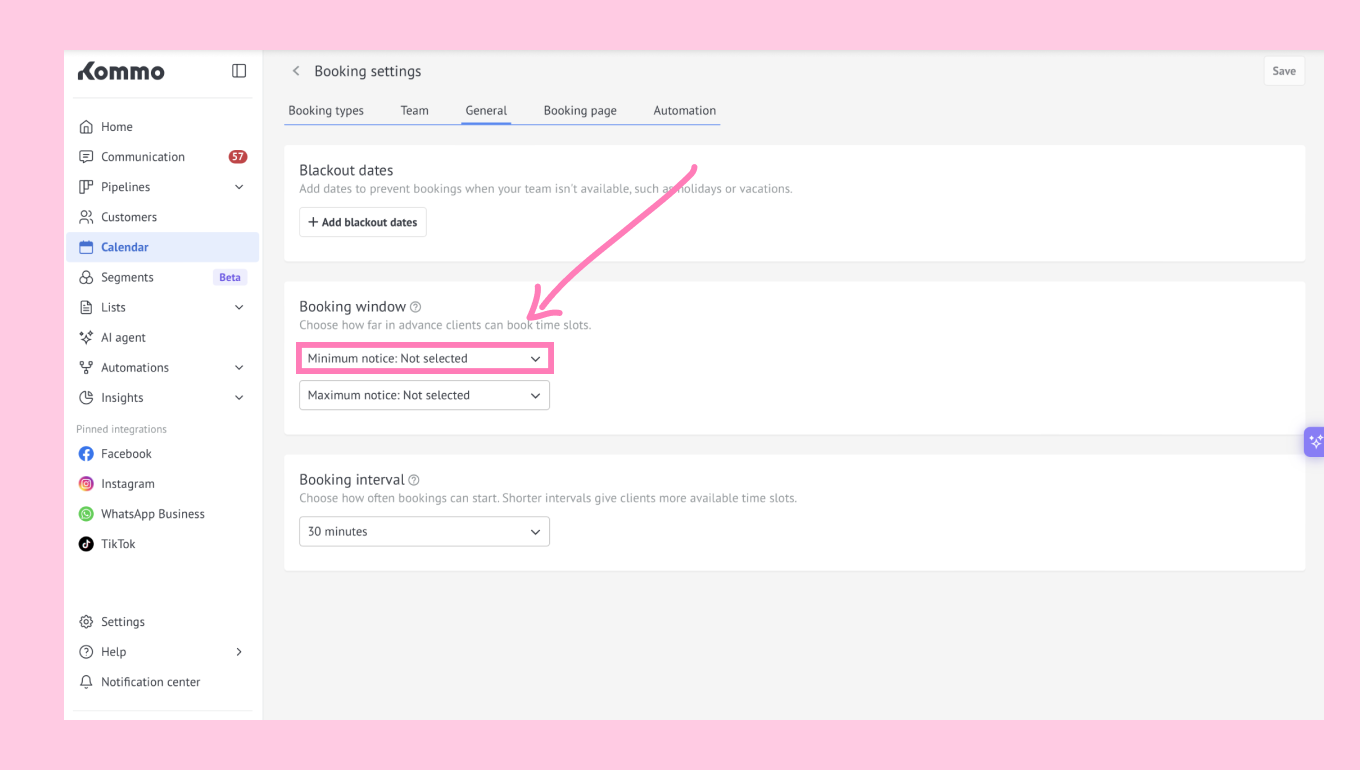
Click Minimum notice. → Select one of the options available.
Minimum notice is the shortest amount of time required before a booking. Clients can only select dates after this period. For example, with a 1-day minimum notice, if a client opens a booking page on March 1, the earliest available time slot for booking will be March 2.
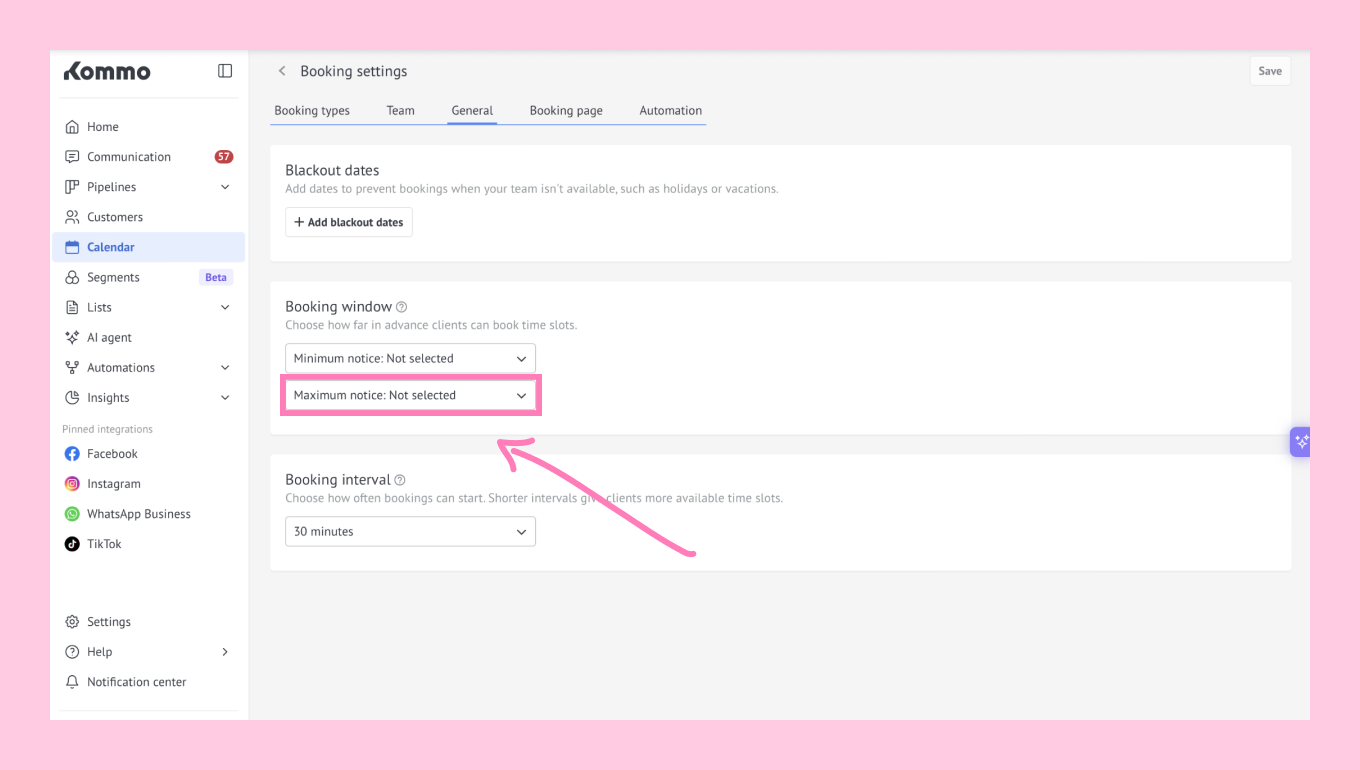
Click Maximum notice. → Select one of the options.
Maximum window is the farthest in advance a booking can be made. Clients can only select dates within this limit. For example, with a 30-day maximum notice, if a client opens a booking page on March 1, the latest available time slot will be March 31.
Step 3: Set the booking interval
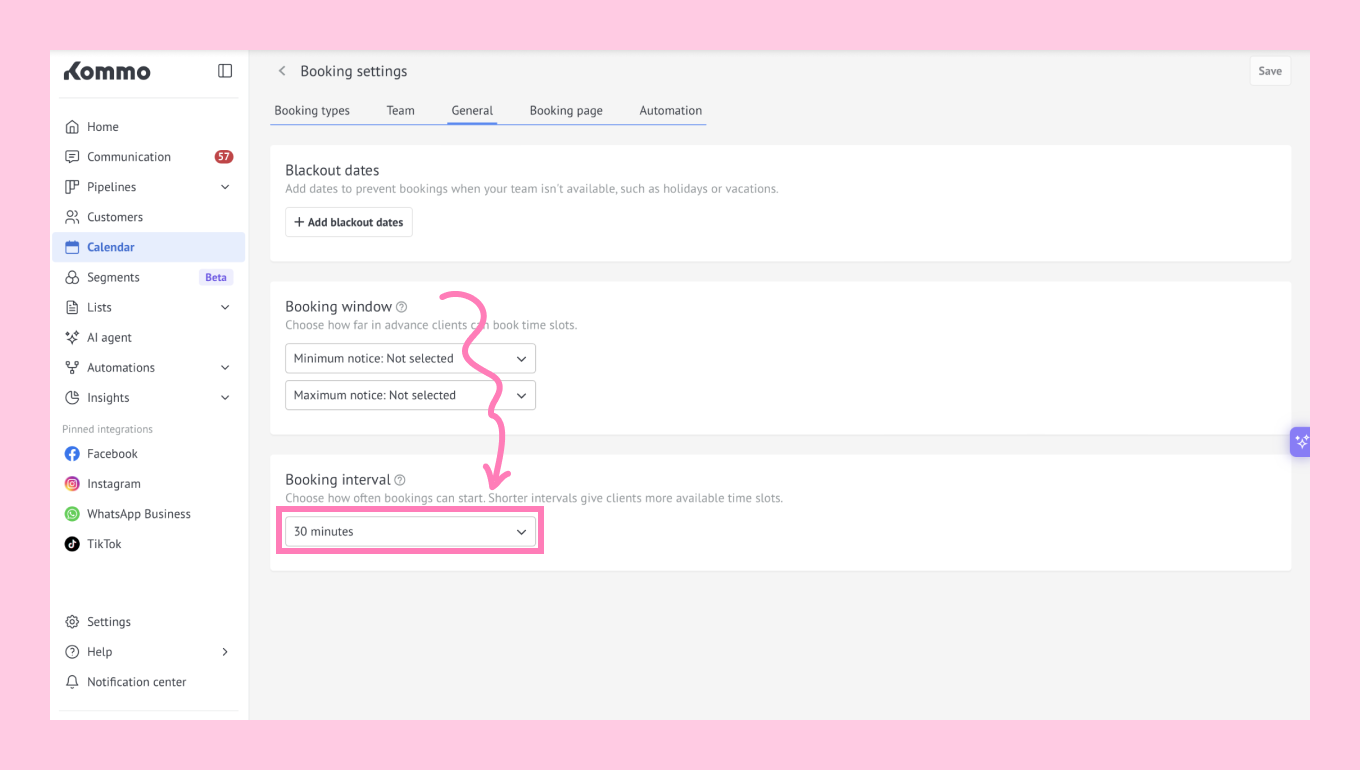
Booking interval determines how frequently your available start times appear (e.g., every 15, 30, or 60 minutes).
Click Booking interval → Select one of the options (5 minutes, 15 minutes, 30 minutes, 45 minutes, or 1 hour).
Booking interval is the gap between available start times—for example, 30 minutes allows bookings at 10:00, 10:30, 11:00, and so on.
Note: Booking intervals also affect which time slots are shown on the booking page to clients.
Set up your booking page and booking links
To help clients book appointments online, you can:
Control booking page availability and settings. Learn how to do it in our Booking page article.
Create and share booking links with clients. Read more about this feature in our Booking links article.
Note: You can also disable the booking page anytime.
Automate bookings with Salesbot and AI agent
To automate your booking process, you can:
Configure Salesbot to send automated notifications to clients. Learn more about the feature in our Salesbot article.
Set up AI agent to automate bookings. Check our AI agent article for more details.
Note: Salesbot sends notifications only to leads. To notify responsible users about upcoming bookings, use Kommo’s built-in notifications.
Save your availability settings
Click Save to apply all changes.
Once your settings are applied, your calendar layout will be updated. Available time periods will remain white, while excluded intervals will be shaded.
Note: These availability settings are also used for booking links and AI agent bookings.