What you’ll need:
Available on the Pro and Enterprise plans, and 14-day trial.
Admin access in Kommo.
Keep in mind:
Bookings are available only if at least one booking type and time slot are configured.
The booking page becomes unavailable if no booking types are configured.
Bookings cannot overlap, and unavailable time slots cannot be selected.
Clients do not receive automatic notifications after booking unless they are configured in the booking settings.
The booking page is an external page where clients can schedule bookings without needing a Kommo account.
When clients open the booking page, they can view available services, specialists, and time slots based on your booking settings, including configured availability and booking types. Only options that meet these settings can be selected, and the entire booking process is completed directly on this page.
Note: You can also cancel or reschedule bookings and add them to Google Calendar from the booking page.
Before you start: configure booking availability
Before opening a booking page, make sure that at least one booking type and available time slots are configured.
Booking availability also depends on your schedule settings, including available days and working hours.
If booking settings are incomplete, the booking page may not allow bookings to be completed or may become unavailable.
To learn how to configure booking settings correctly, check our article.
Add a booking page as a lead source
The booking page works as a Lead source in the main pipeline of your Kommo account. It is created automatically when you set up your first booking type.
By default, it is assigned to your main pipeline, but you can change it later in the Booking page tab. The booking page is available only while a pipeline is assigned.
You can manage the booking page as a source in two areas of Kommo:
Calendar — assign the pipeline and set up Duplicate control.
Pipelines — add the booking page as a source.
Add a booking page as a lead source from Calendar
To manage your booking source in Calendar:
Go to Calendar → Booking settings.
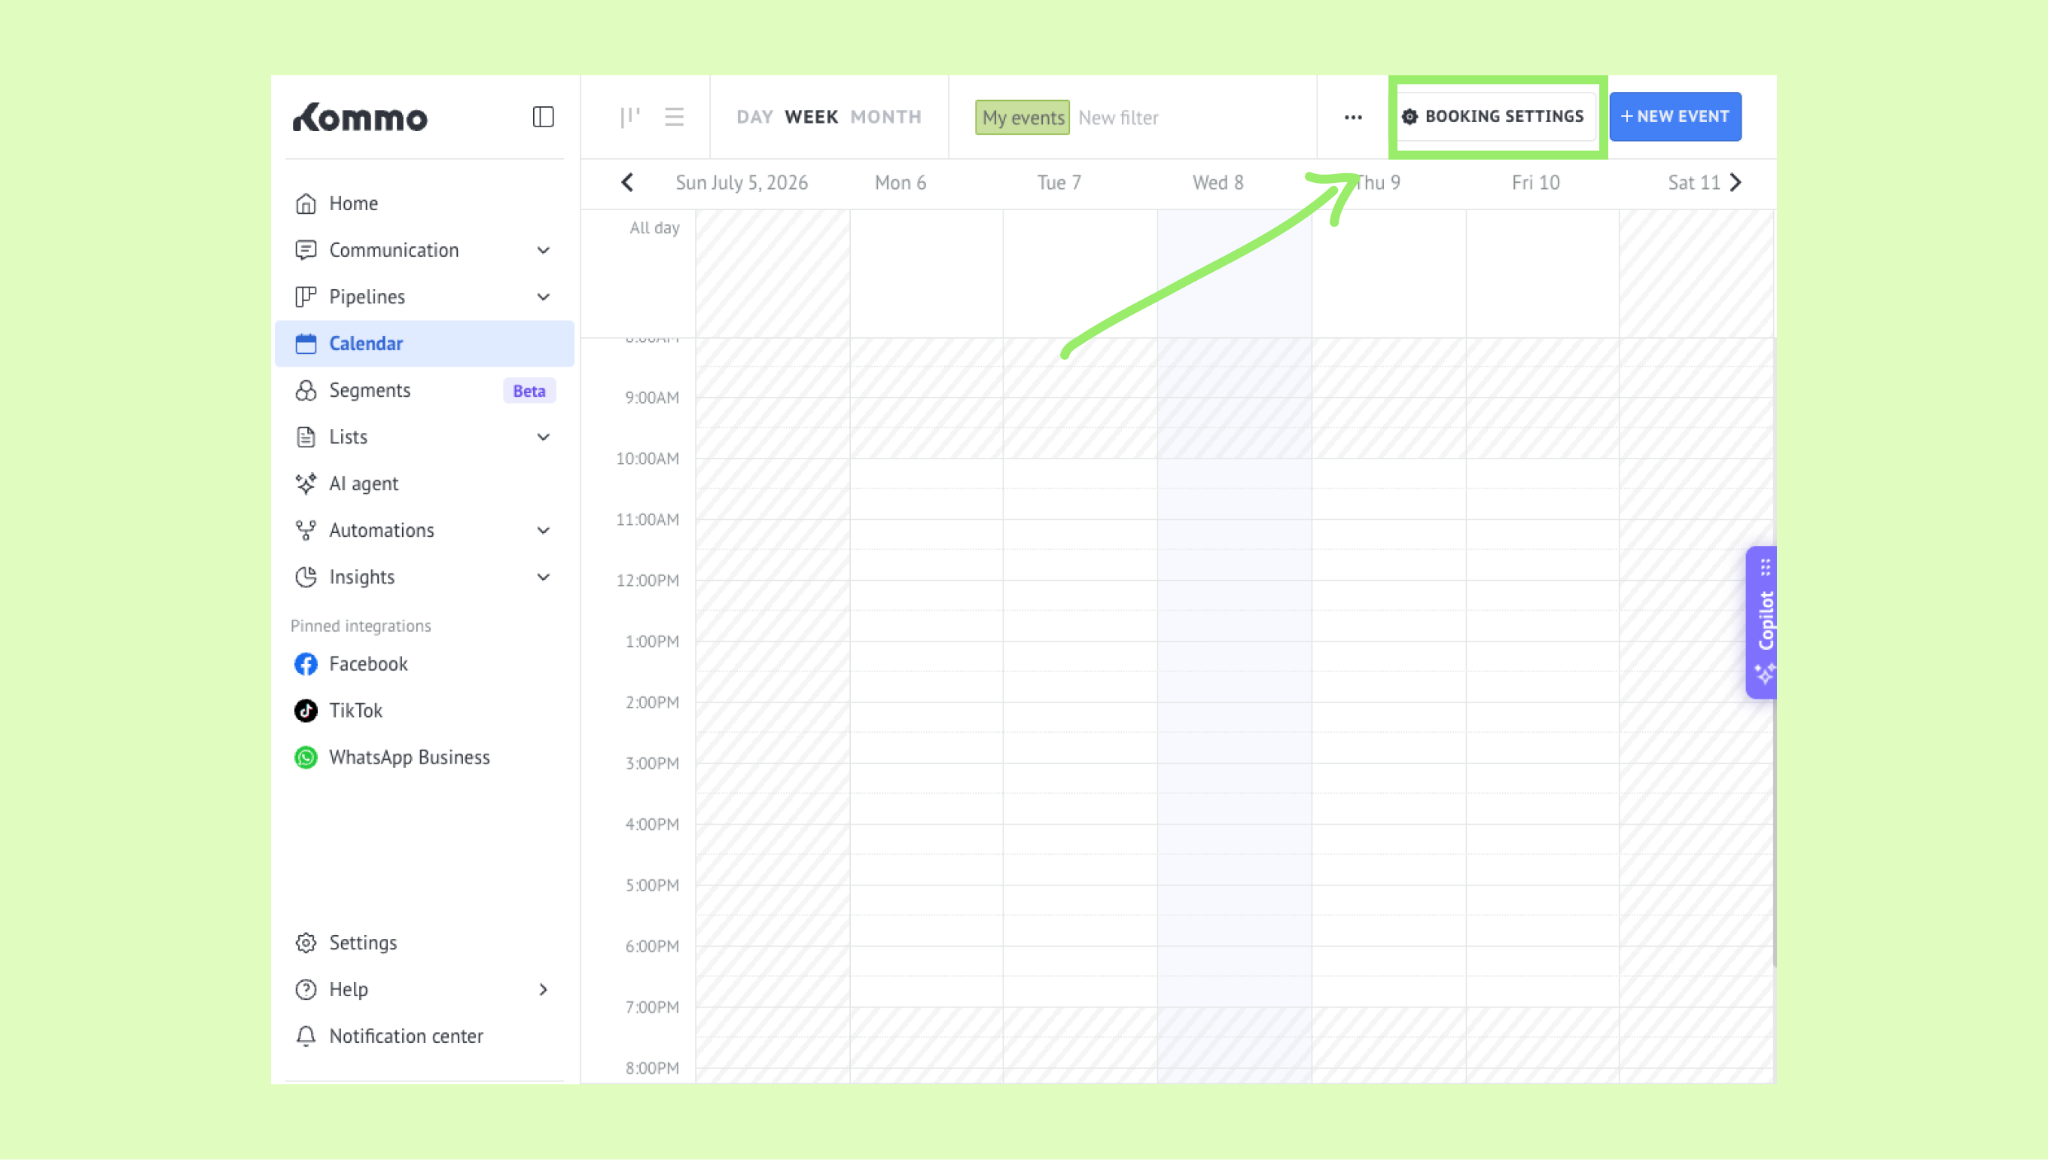
On the Booking page tab, click Select a pipeline → choose the main pipeline.
.png)
Important: If no pipeline is assigned, the booking page is fully deactivated. Leave a pipeline selected if you want clients to be able to make bookings.
In the Duplicate control section, choose how new bookings are assigned to leads.
.png)
Always create a new lead — Every new booking creates a separate lead.
Add the booking to the most recent active lead — Kommo adds the booking to the client’s most recent active lead. If there are no active leads, it adds the booking to the most recent won or lost lead. If no leads exist, Kommo creates a new one.
Add the booking to the most recent won or lost lead — Kommo adds the booking to the client’s most recent closed lead. If there are no closed leads, it adds the booking to the most recent active lead. If no leads exist, Kommo creates a new one.
Add a booking page as a lead source from Pipelines
To find your booking page source in the Pipelines:
Go to Pipelines → select your main pipeline.
Click Automate or, if you click the three dots (…), select Edit pipeline.
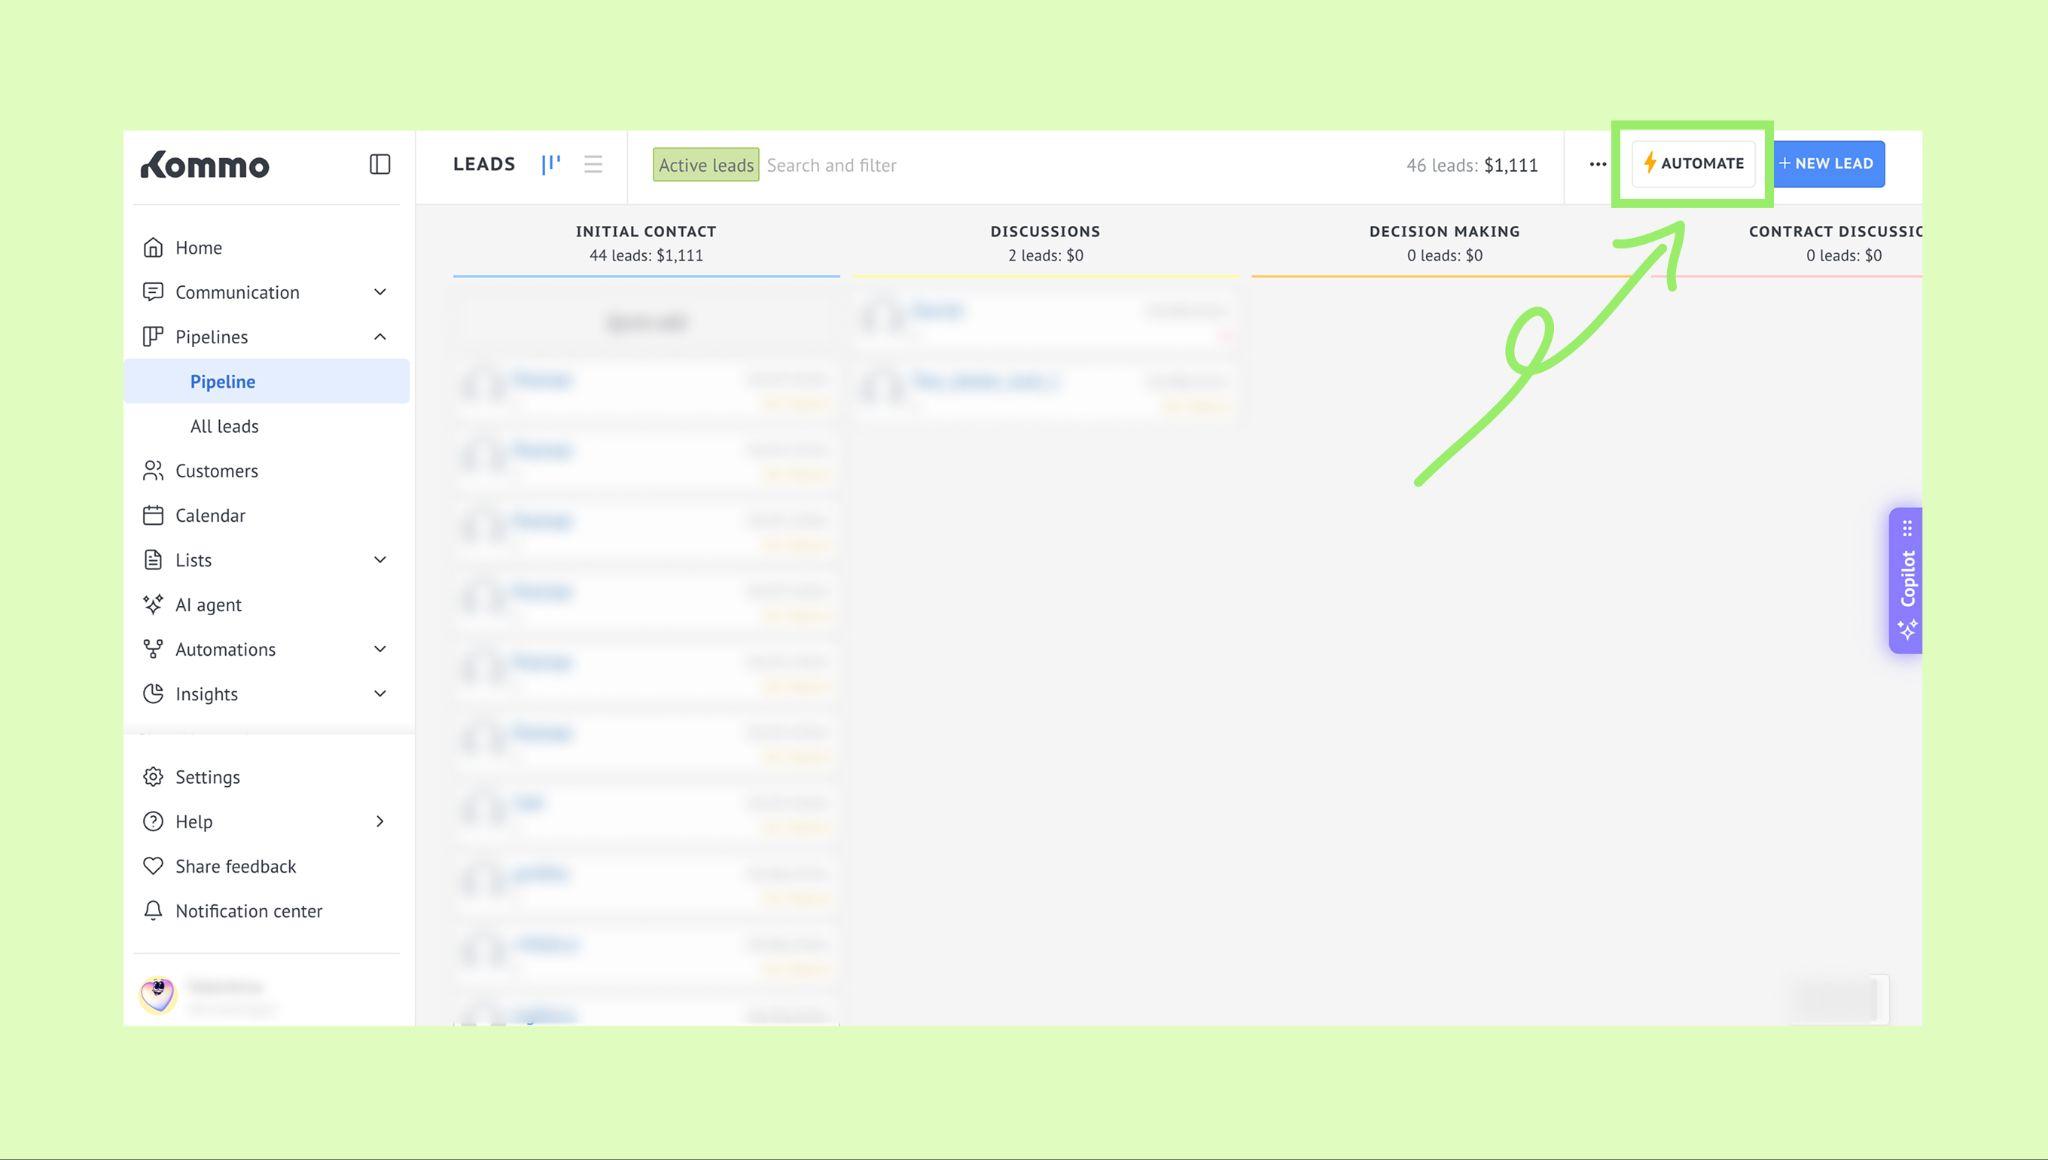
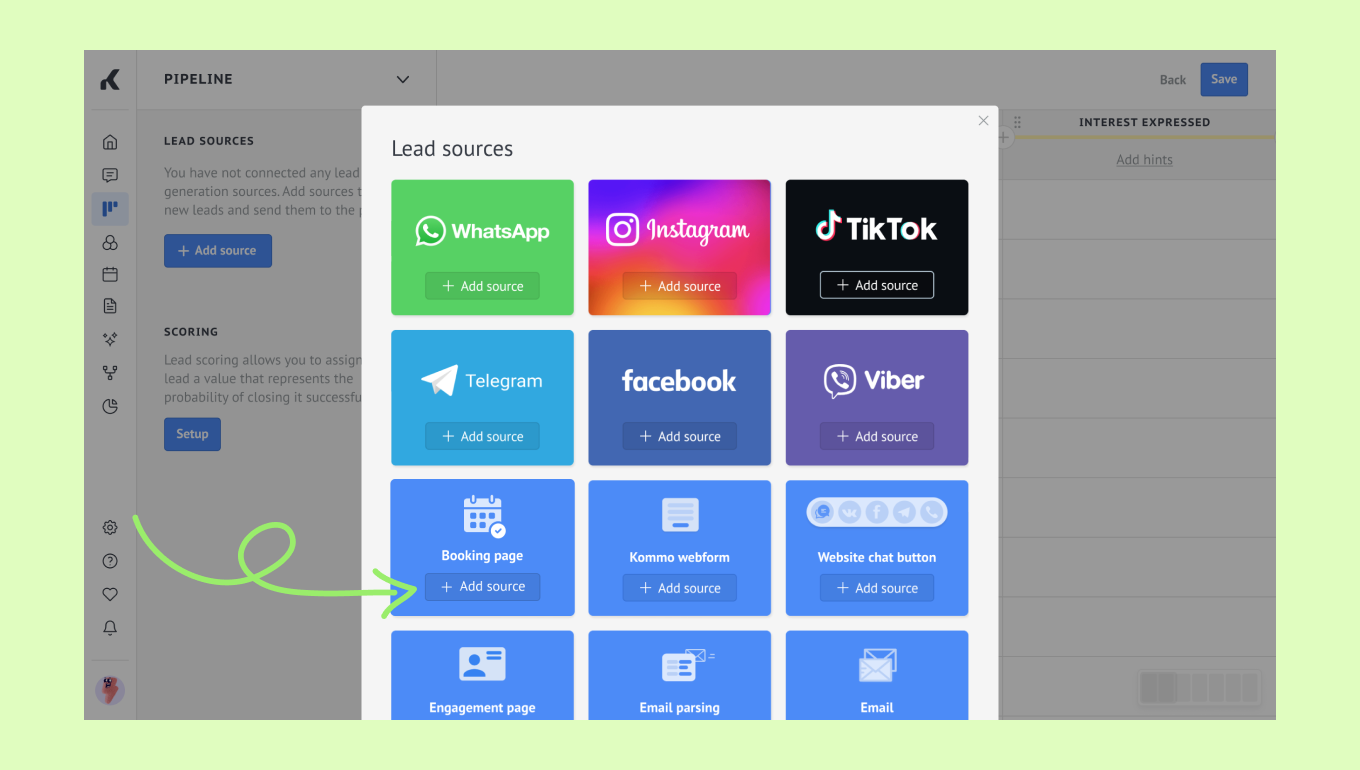
In the Lead sources section, click + Add source.
Locate the Booking page tile and click +Add source.
Click Go to calendar to complete the setup.
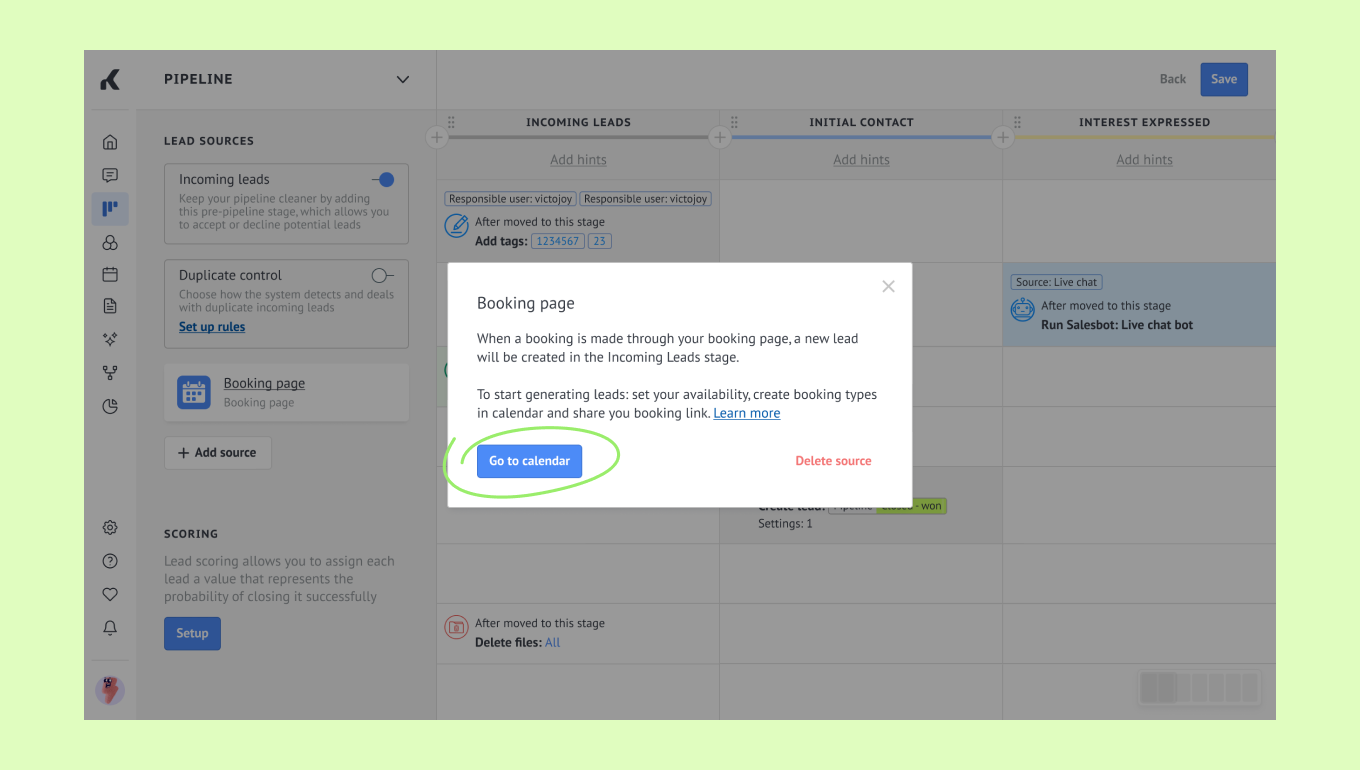
To learn how to configure the booking settings correctly, check our article.
When clients book appointments through the booking page, they appear as new leads in the Incoming lead stage of your pipeline.
Learn more about sources and duplicate control in our article.
Preview your booking page
Once booking settings are configured, you can open the booking page in Kommo to review how it looks before sharing it with clients.
Go to Calendar → click Booking settings.
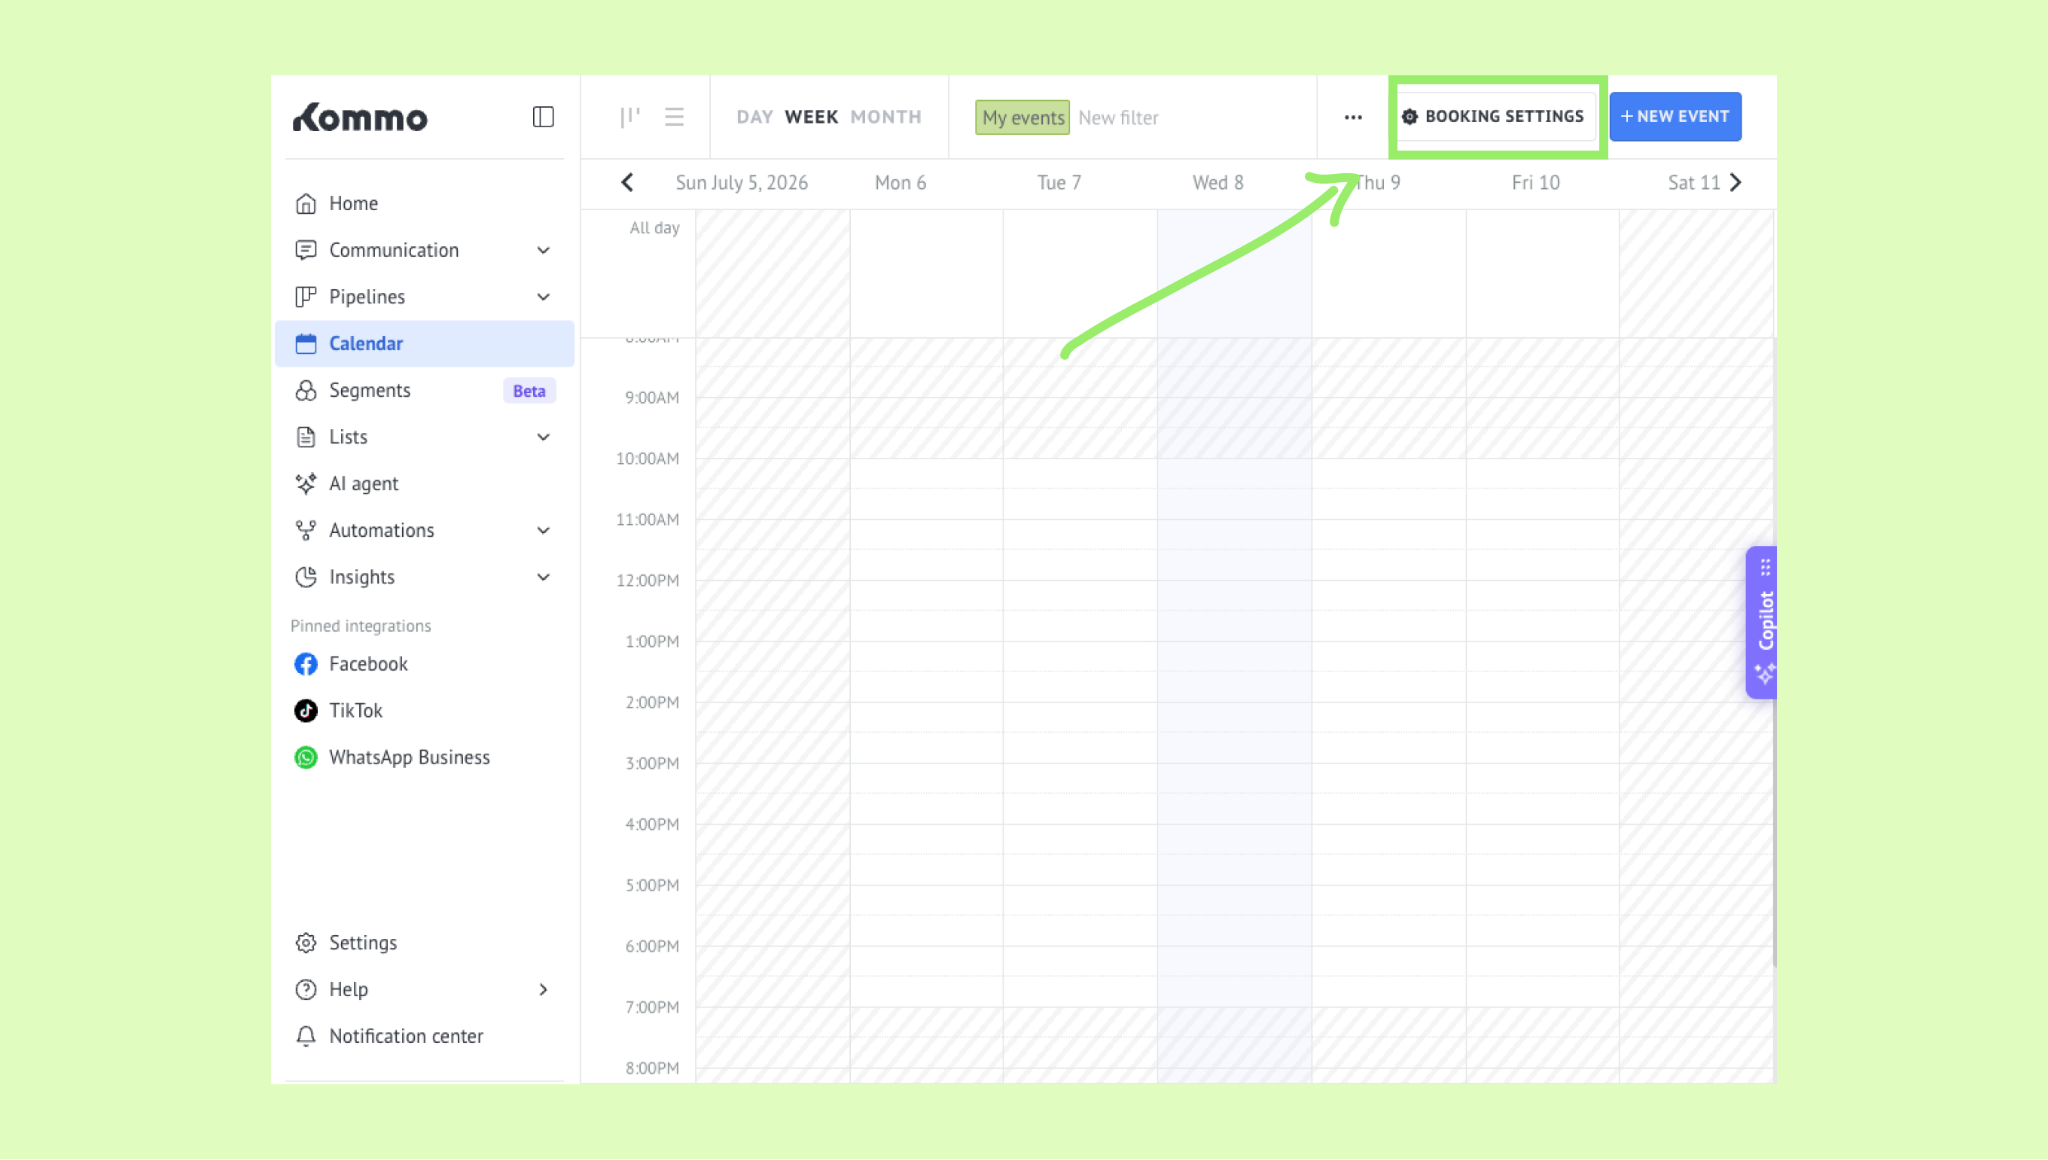
Go to the Booking page tab.
In the Booking link section, click the external link icon.
.png)
The booking page opens, and the booking process can be started.
Important: If booking is not added to the pipeline as a source, the booking link won’t work.
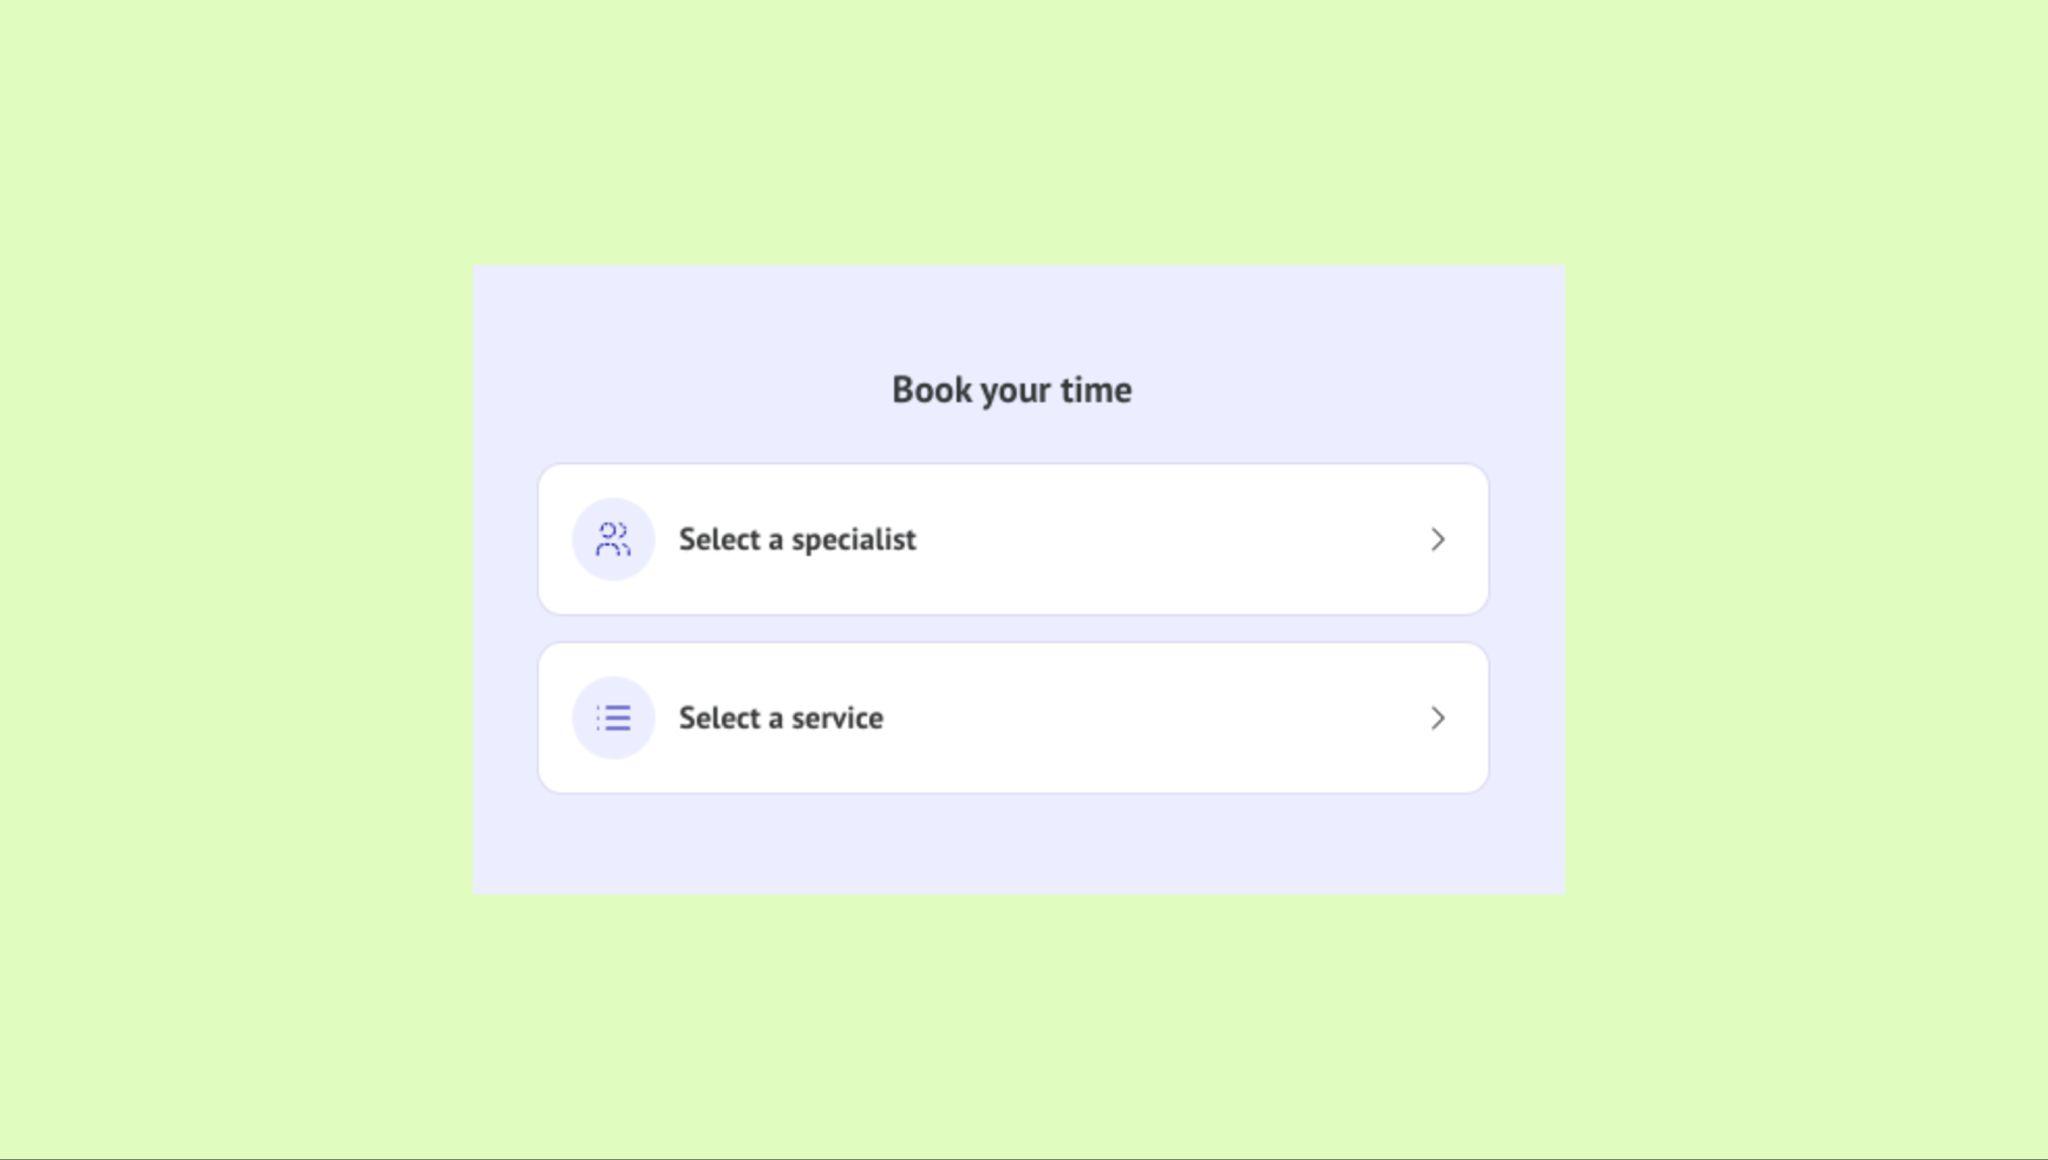
If the booking page cannot be opened, an error message will appear.
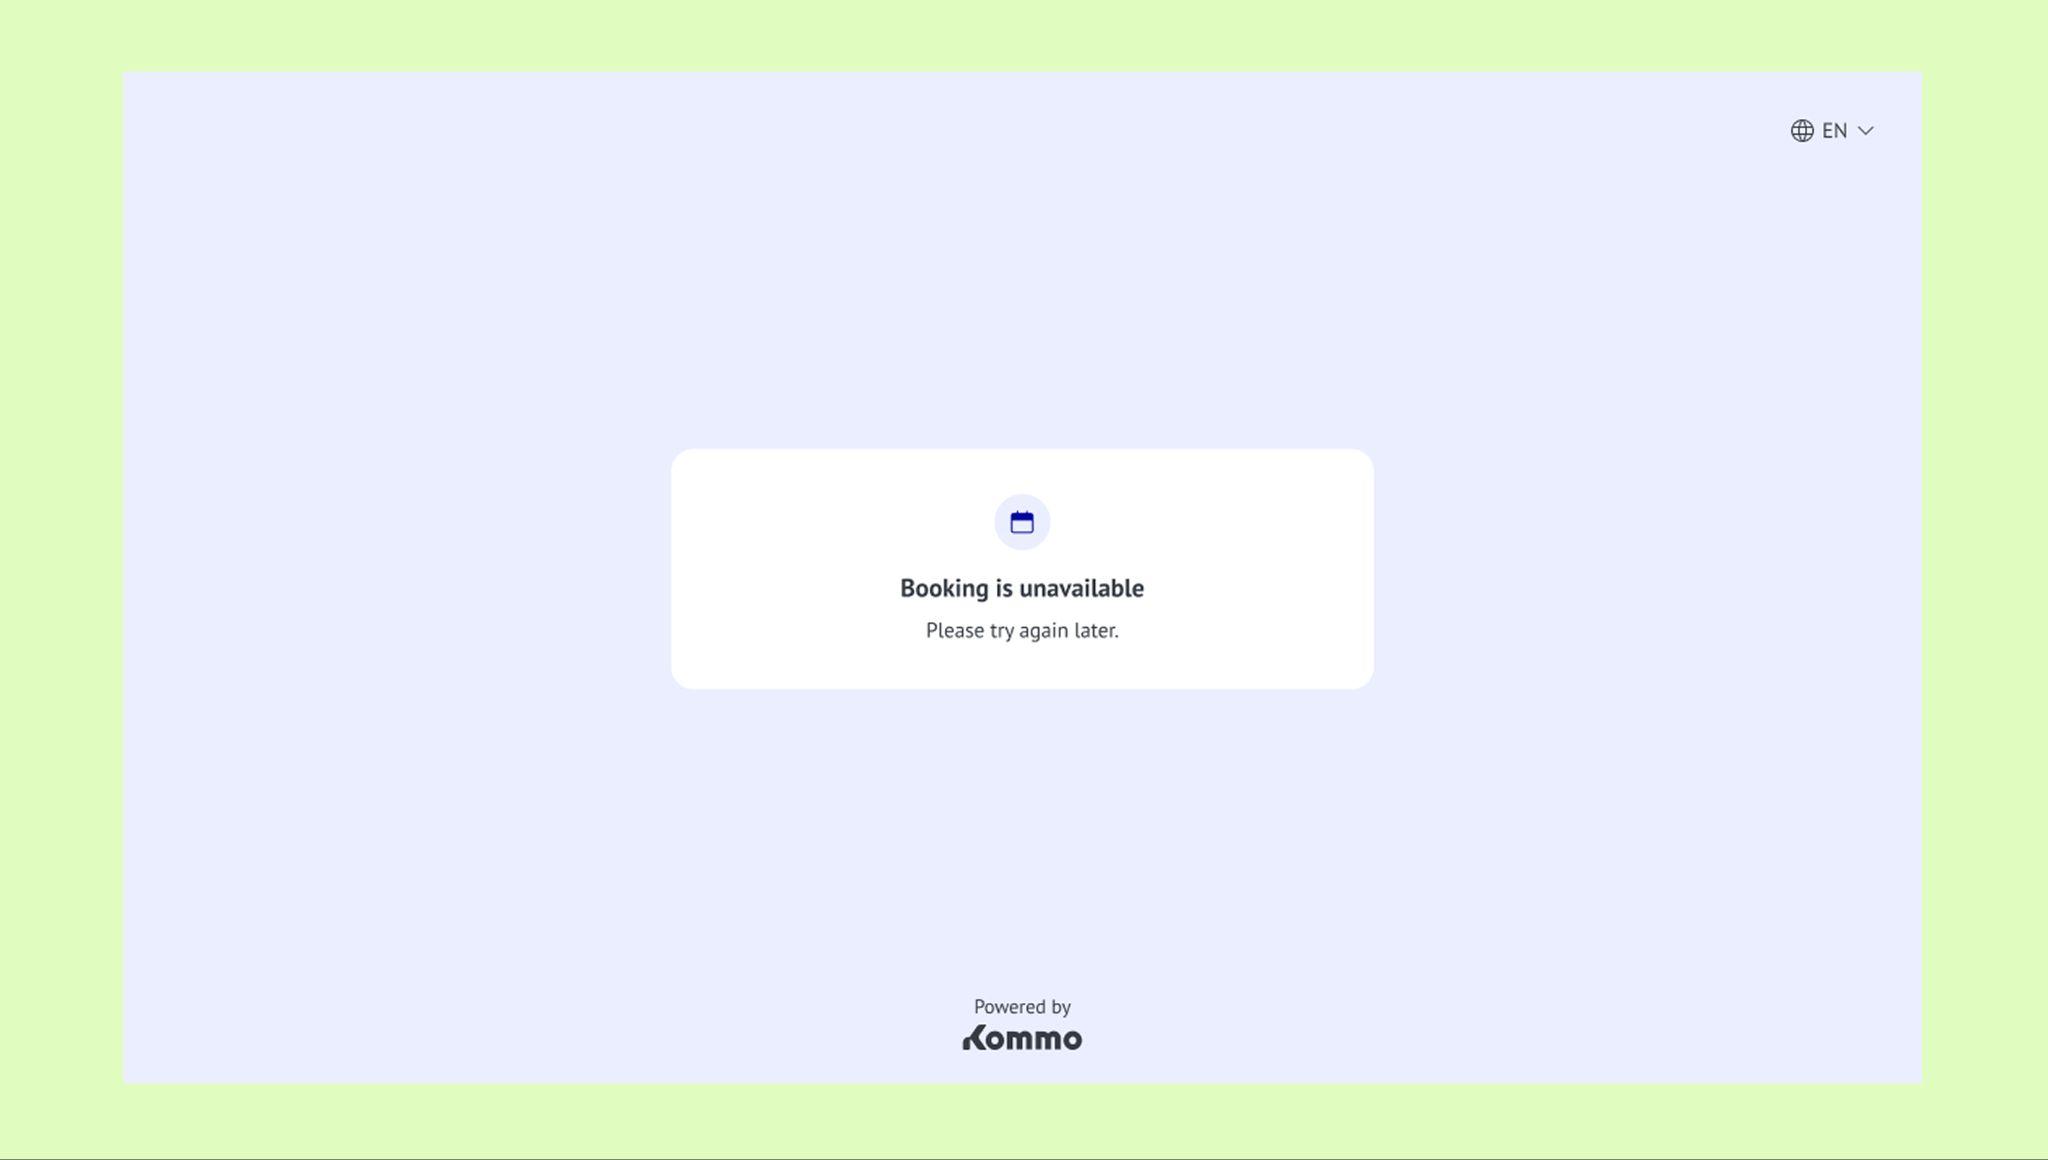
To learn how to fix this and other booking problems, check our troubleshooting article.
Share your booking page link
Clients can only access the booking page after they receive a booking link.
To share the booking link with clients:
Go to Calendar → Booking settings → Booking page tab.
Click the copy icon to the right of the link.
.png)
Or open an existing lead card → Statistics tab → in the Booking link section, click the copy icon to share a lead-specific booking link.
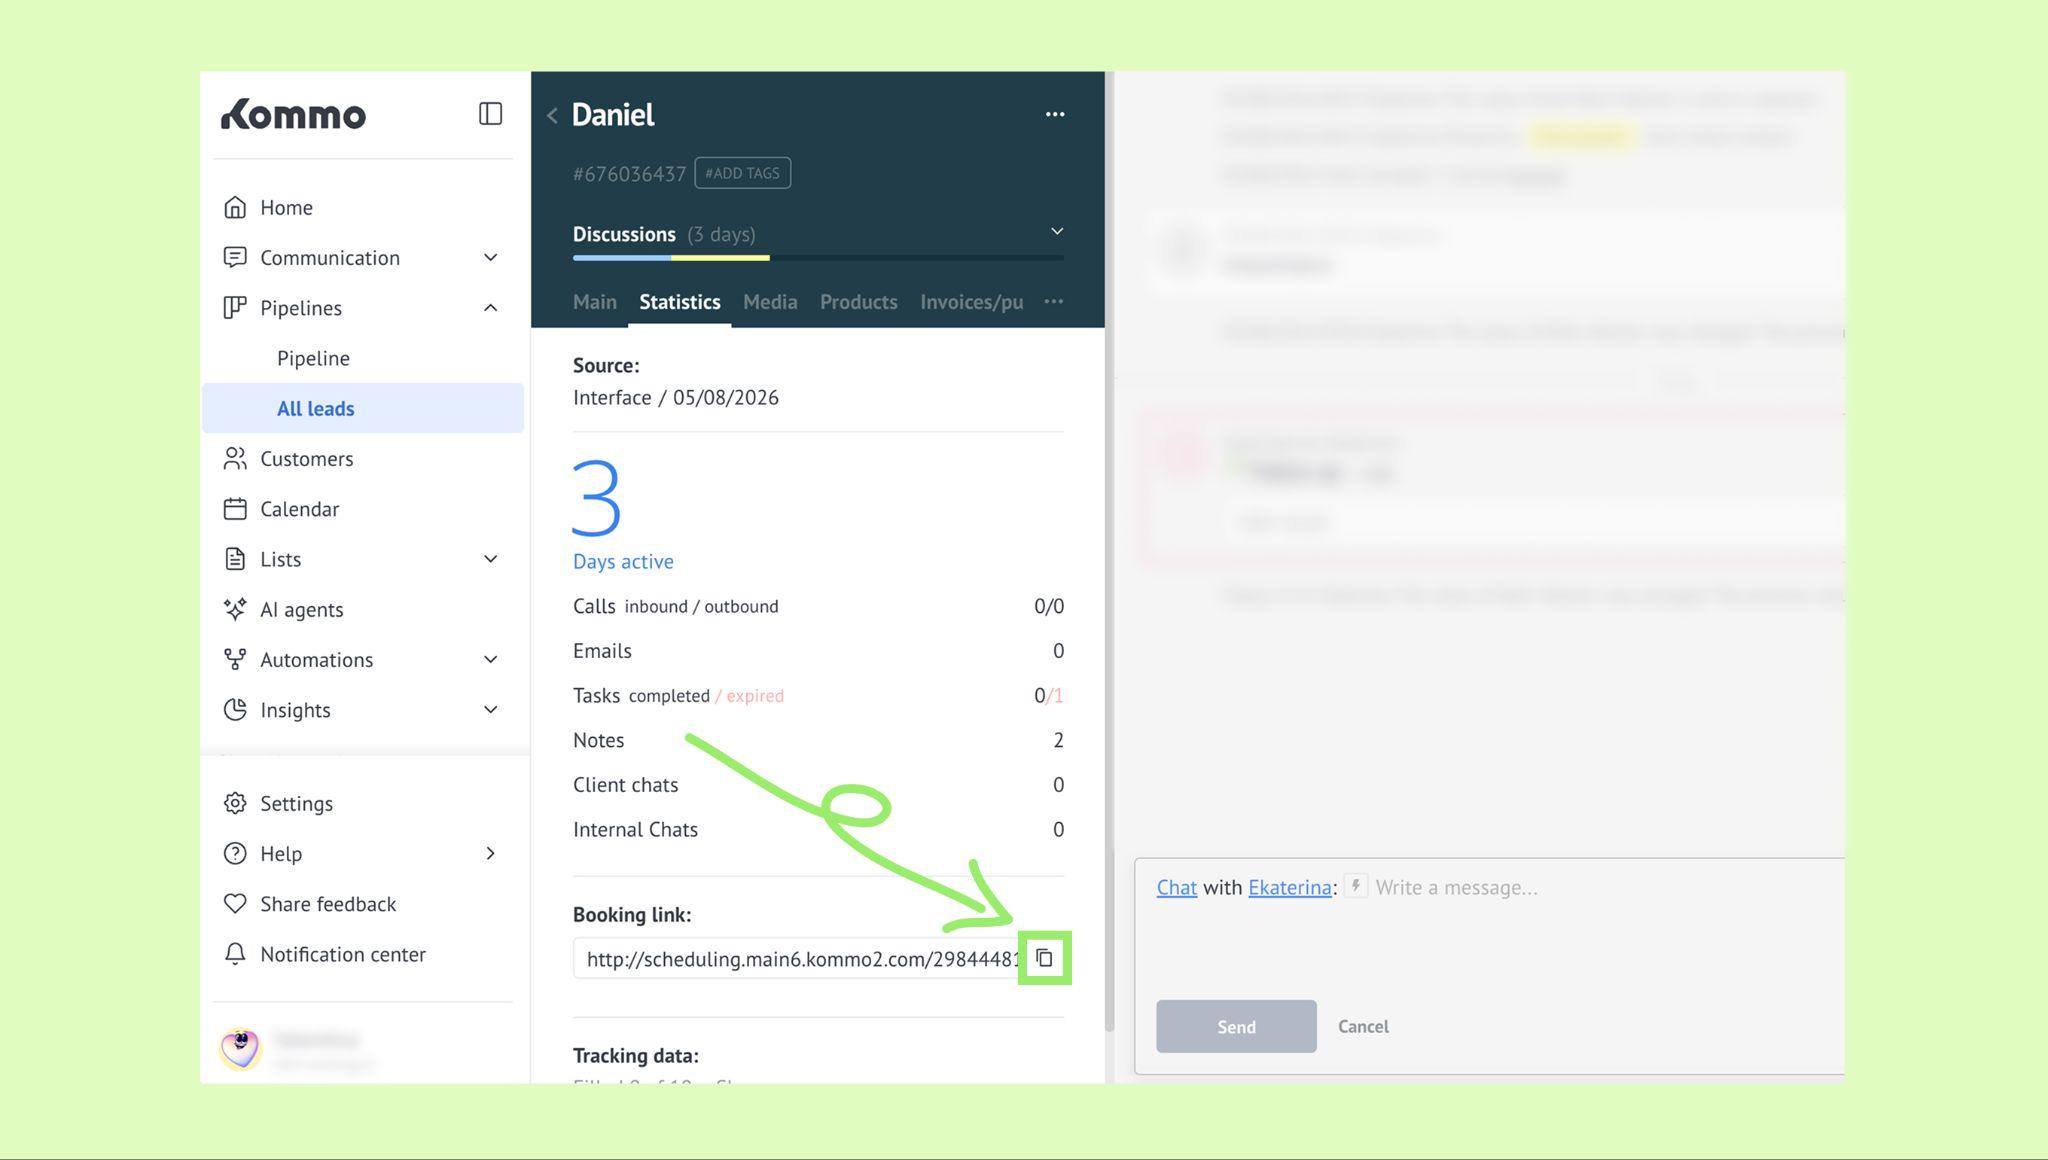
3. Share the copied link with your clients.
Clients will be able to use the link to open the booking page and schedule appointments based on your availability.
To learn more about booking links, check our article.
Note: Clients do not receive automatic notifications after booking. To send booking confirmations and reminders, go to Calendar → Booking settings → Automations to configure a notification bot in the Automate booking notifications section.
Learn how to set up a notification bot in our article.
How clients book appointments from your booking page
Once clients open the booking link, they are redirected to the booking page.
To create a booking:
Select a specialist and service.
Note: Depending on the booking configuration, clients may start by selecting either a service or a specialist first.
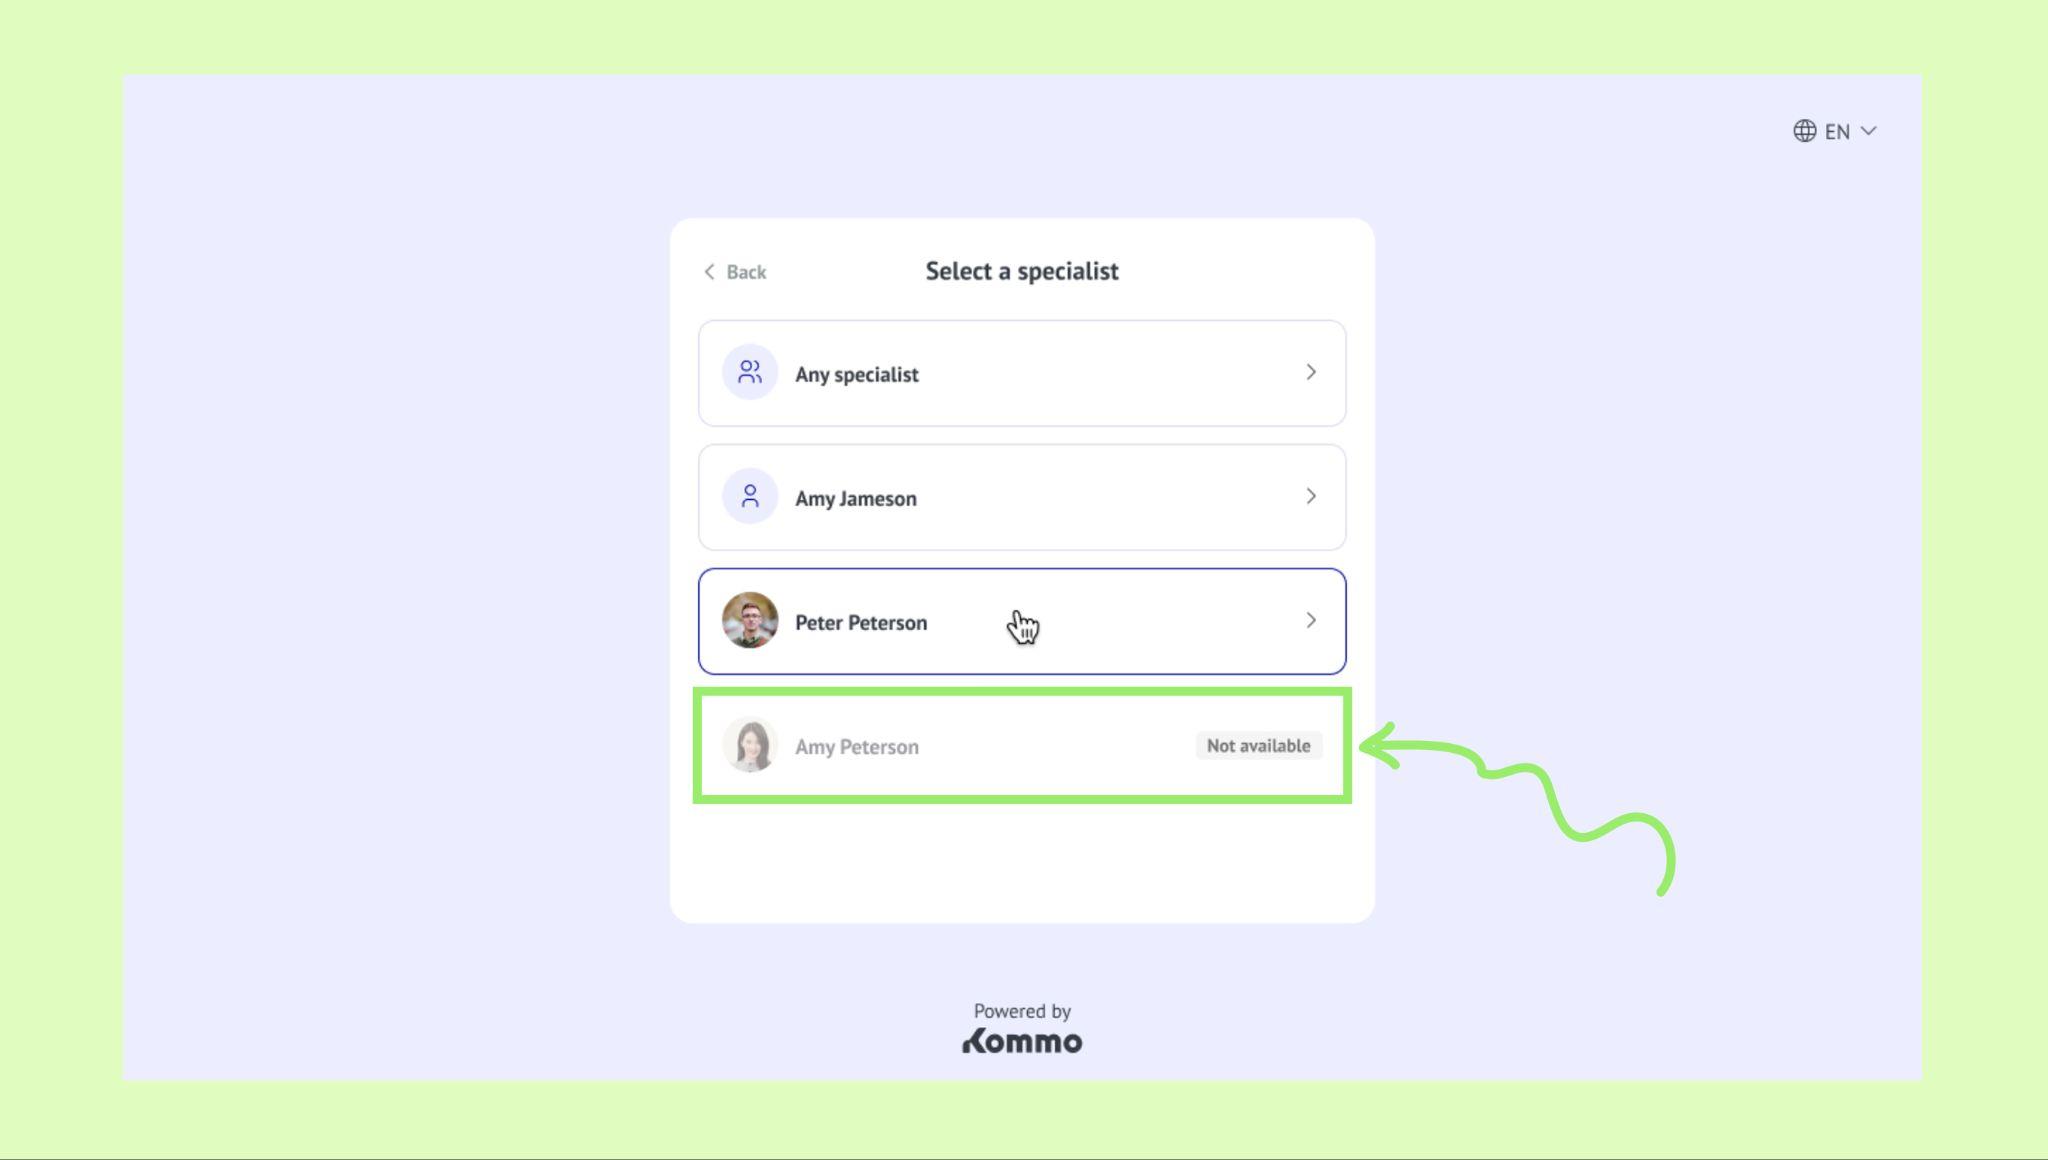
Only available specialists, services, and time slots can be selected. If a specialist is unavailable, the booking page shows a Not available status.
Select an available date and time slot.
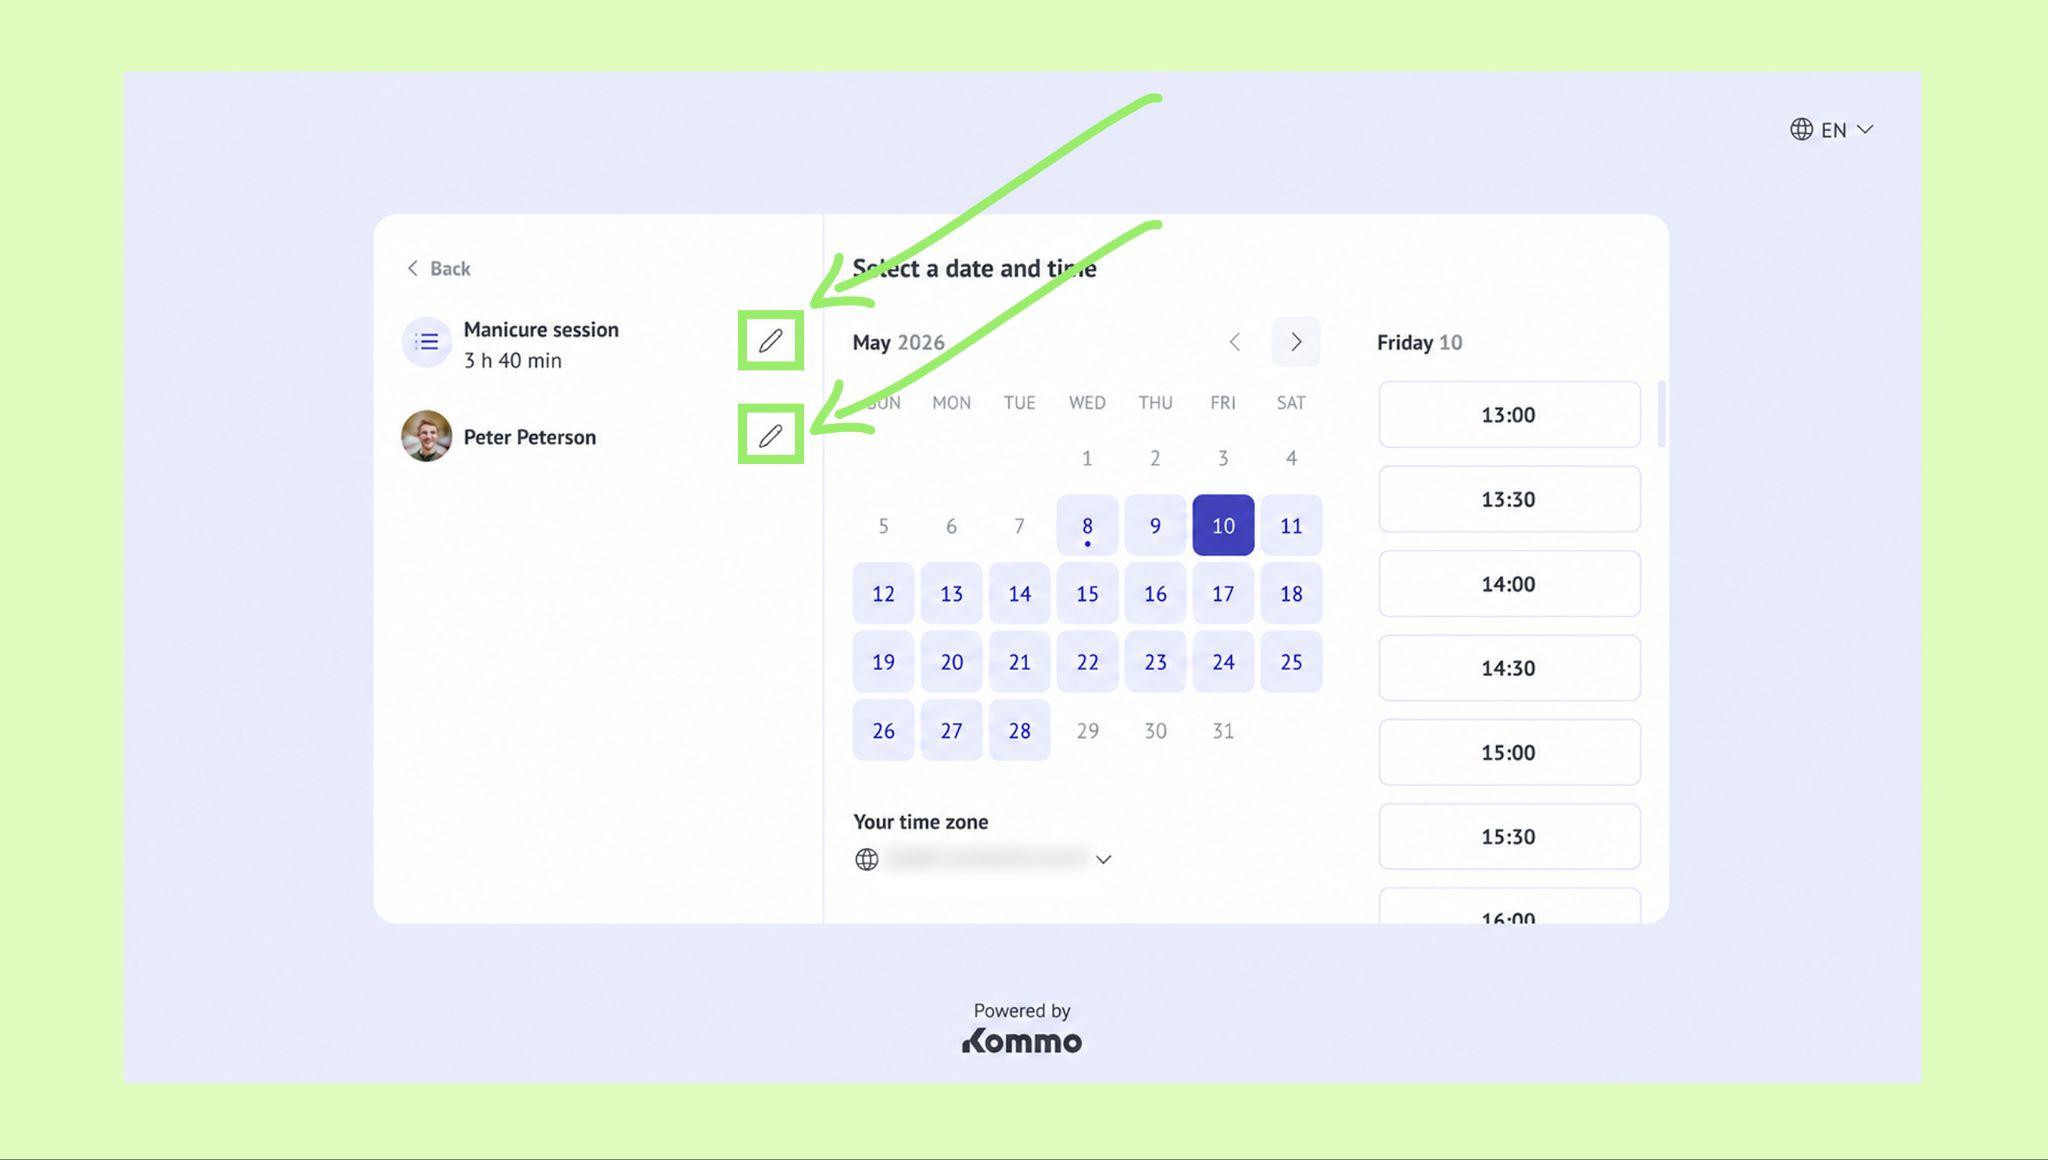
At this step, the selected service or specialist can still be changed by clicking the pencil icon.
Enter the required contact information. Clients must fill in the following fields:
Name (optional)
Phone number (required)
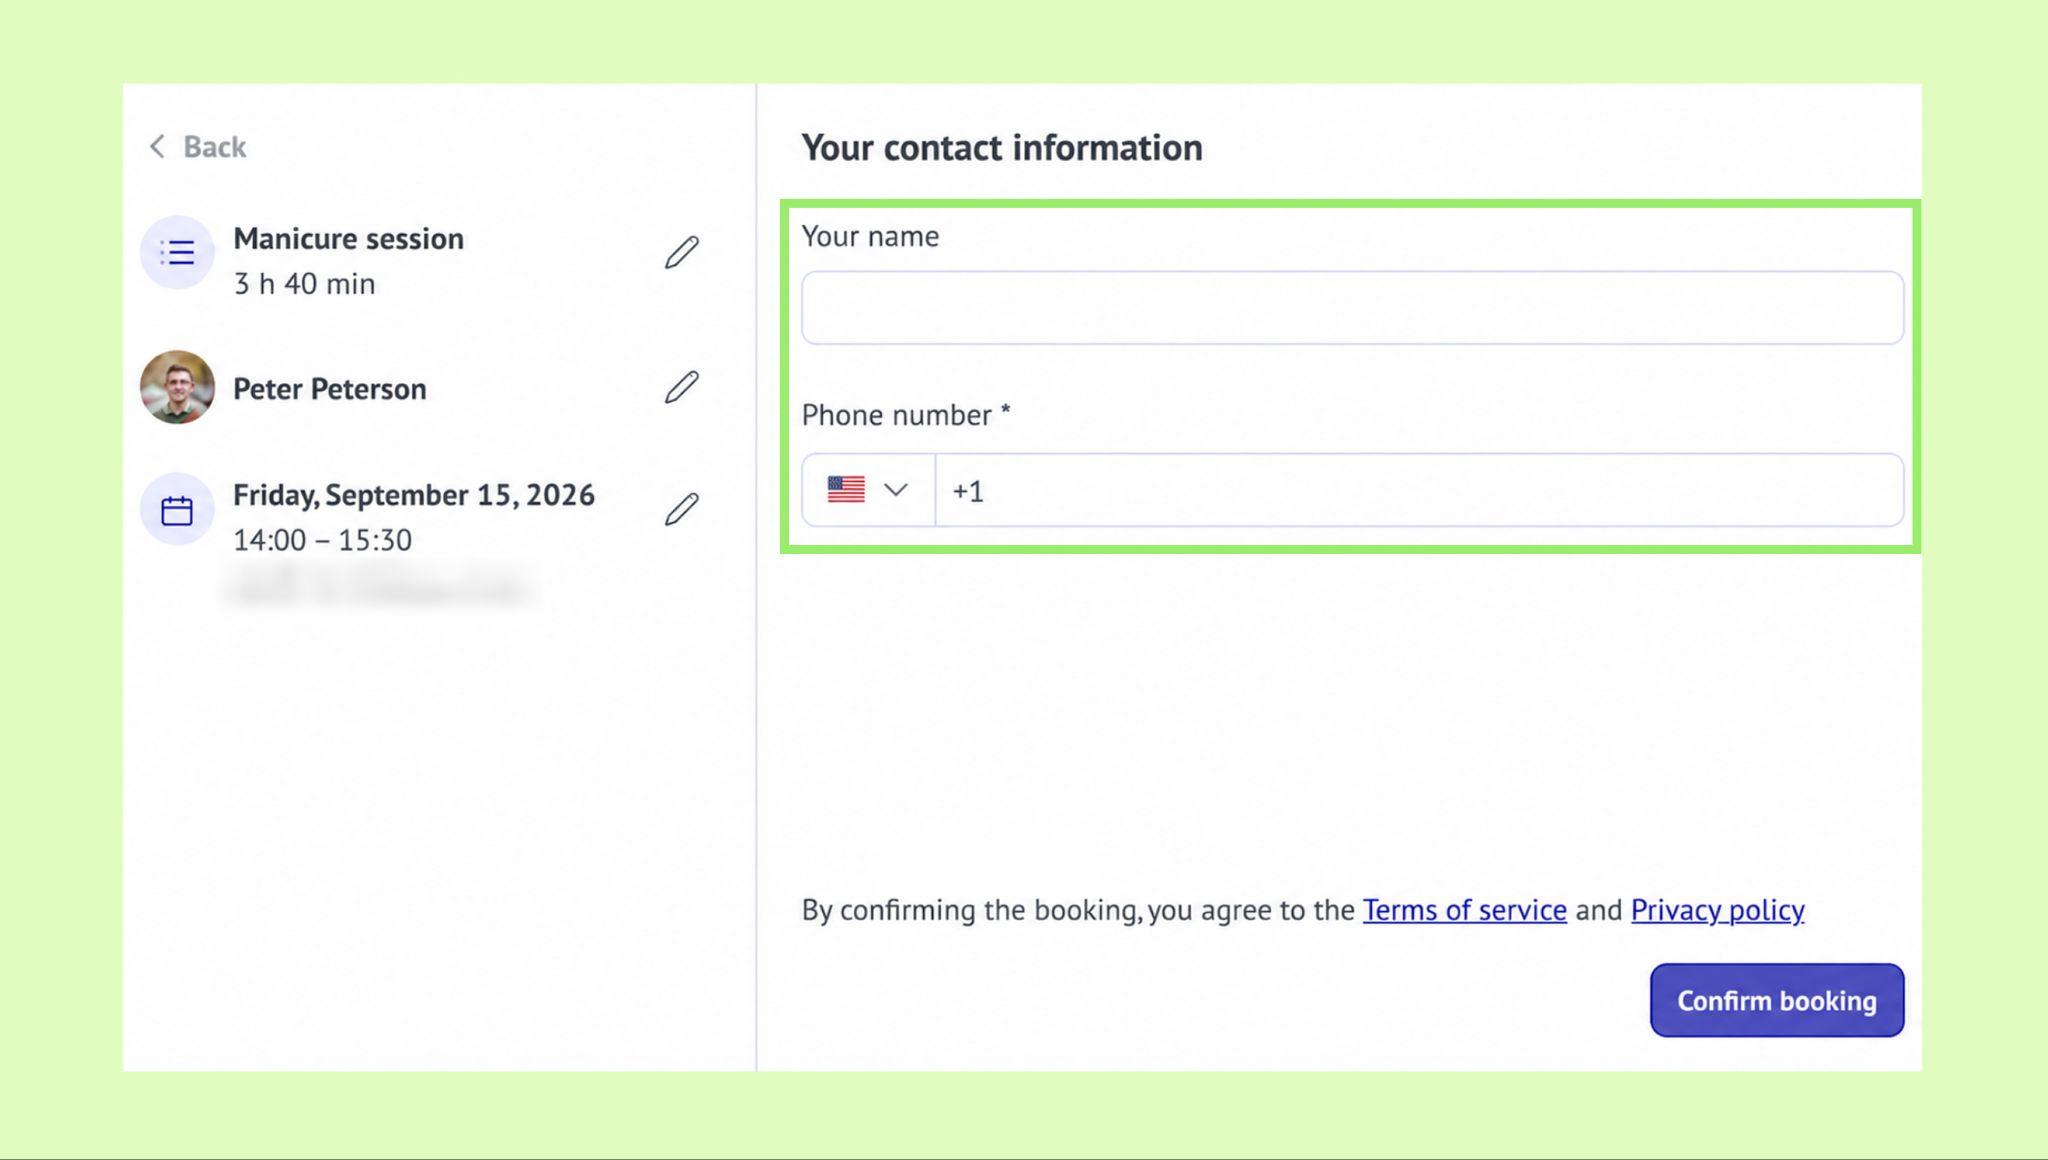
Important: The phone number must be entered in a valid format and include the correct country code.
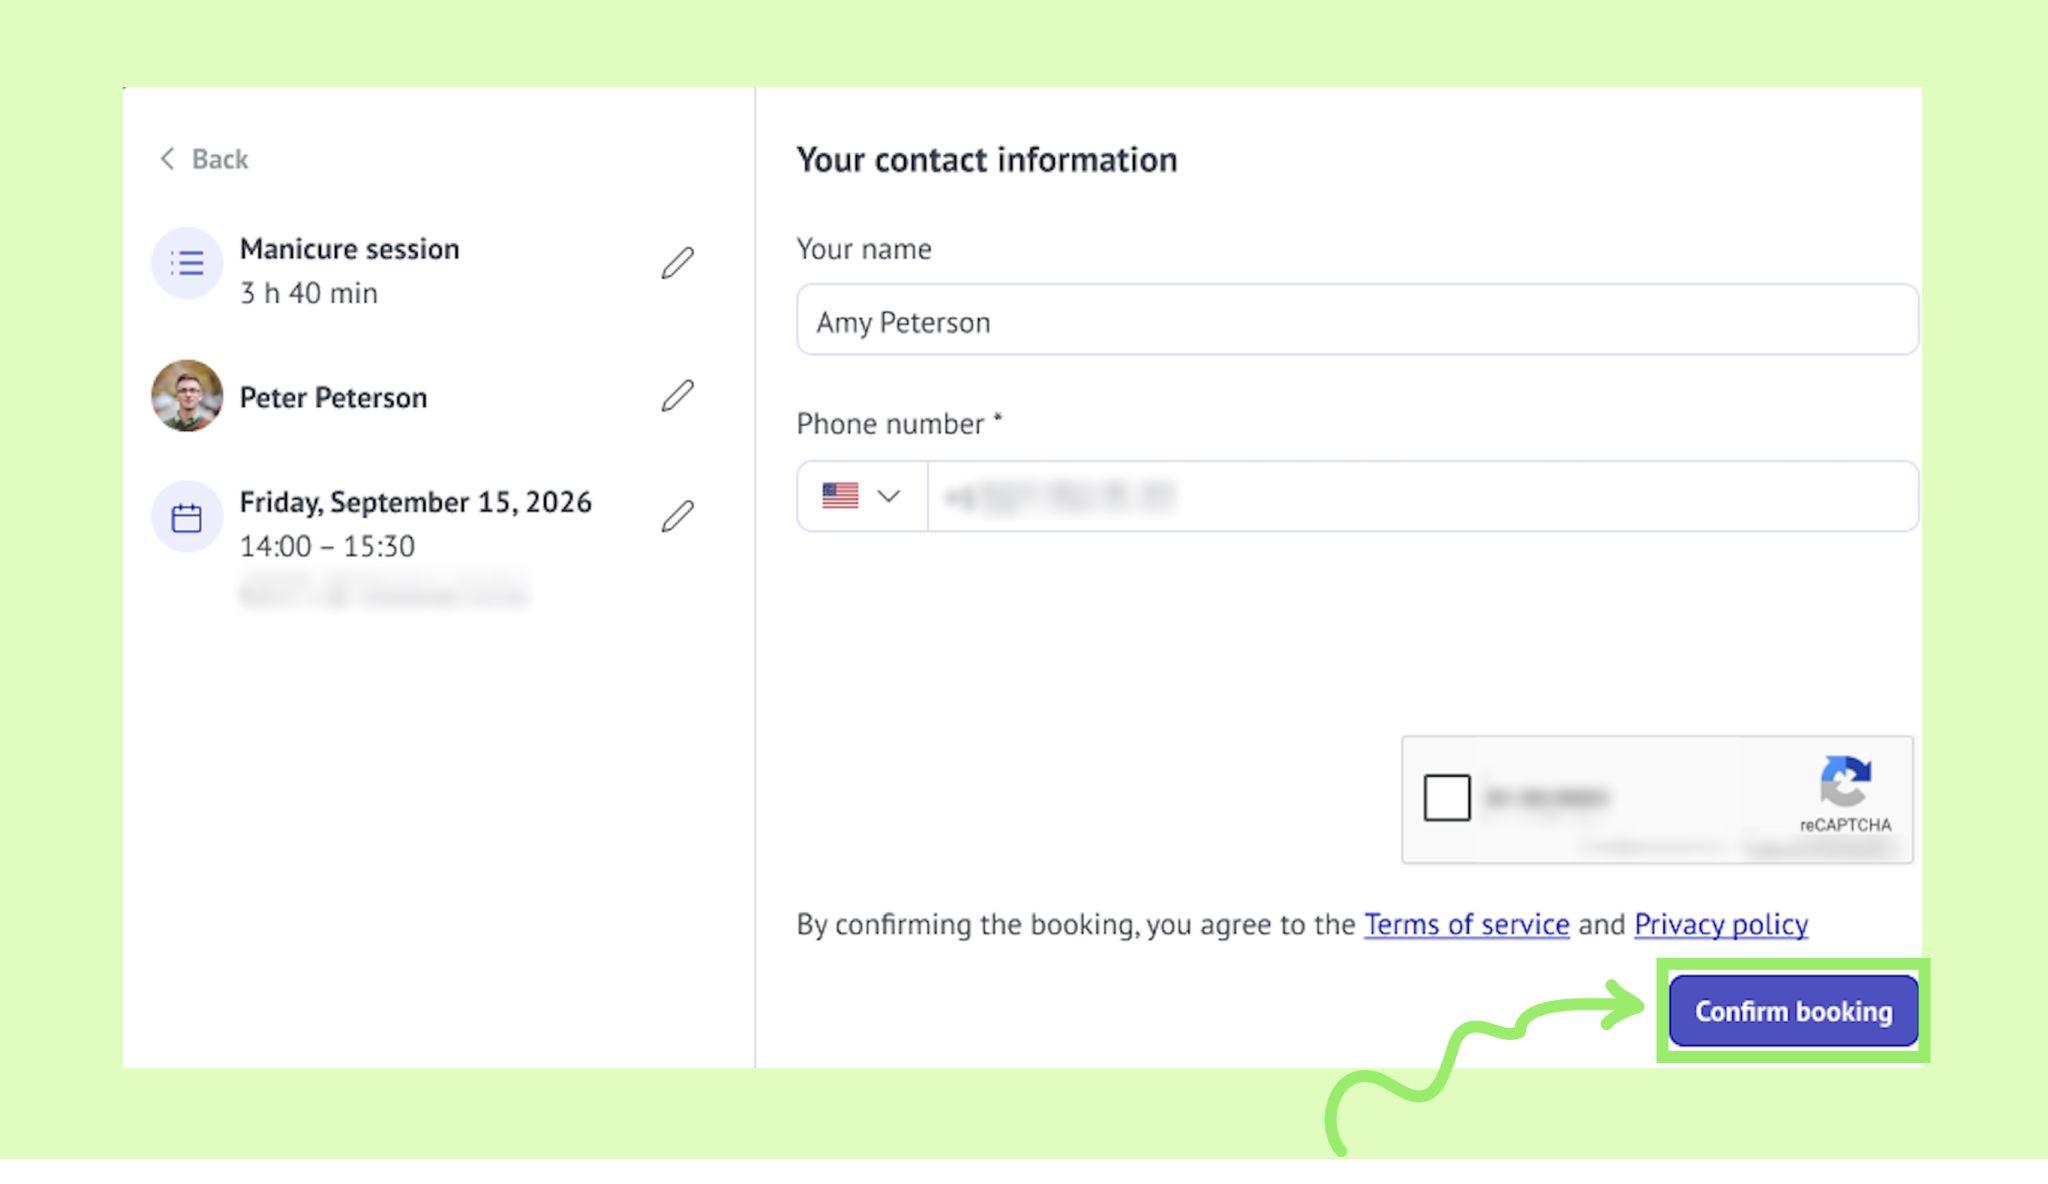
Complete the CAPTCHA verification and click Confirm booking.
After the booking is confirmed, clients see a summary window with the selected service, assigned specialist, and booking date and time. On this page, clients can:
Add the booking to their Google Calendar by clicking Add to calendar.
.png)
Choose another time by clicking Reschedule.
.png)
Call off the booking by clicking Cancel.
.png)
Create another booking by clicking View available slots.
.png)
Once a booking is completed, it appears in the Calendar section in Kommo, and a lead is created or updated depending on the booking link type. The lead also includes the contact details provided during booking.