What you’ll need:
Pro, Enterprise, or an eligible Pro features trial in Kommo.
Facebook Messenger, Instagram, or WhatsApp Business connected to Kommo.
Access to your Meta campaign assets, including messaging accounts and datasets.
Click-to-Message ads to track.
Keep in mind:
Events are sent through the CAPI pipeline triggers or Salesbot actions you configure.
Delivery depends on the primary contact’s messaging profile and the connected Meta assets.
Meta receiving an event does not guarantee that it will attribute it to an ad.
Set up Meta Conversions API (CAPI) to tell Meta which conversations become qualified leads or purchases in Kommo. These CRM outcomes can help Meta optimize your messaging ads and help you measure campaign results.
You’ll choose when Kommo should send an event, connect your Meta account, select your messaging sources, and check the information sent with the event. You can use either pipeline automation or Salesbot.
1. Choose when to send an event
First, identify the point in your workflow that confirms the outcome you want to report. Then choose the method that matches it:
When the outcome is confirmed | Use | Example |
|---|---|---|
When a lead reaches a pipeline stage | Pipeline automation | Send Qualified Lead when a qualified lead enters the relevant stage. |
When your team moves a paid lead to a stage | Pipeline automation | Send Purchase when a paid lead moves to Closed-won. |
When the customer’s answers meet your qualification criteria in a bot flow | Salesbot | Send Qualified Lead after those answers are confirmed. |
After specific bot steps confirm payment and record the required information | Salesbot | Send Purchase after those steps. |
Important: Neither method detects qualification or payment automatically. Place the trigger or action after the outcome is confirmed. Avoid using both methods to report the same outcome for the same lead.
2. Open CAPI in Kommo
Follow the instructions for your chosen method.
Open CAPI through pipeline automation
Go to Pipelines and select your pipeline.
Click Automate.
In the stage where you want to report the outcome, click + Add trigger.
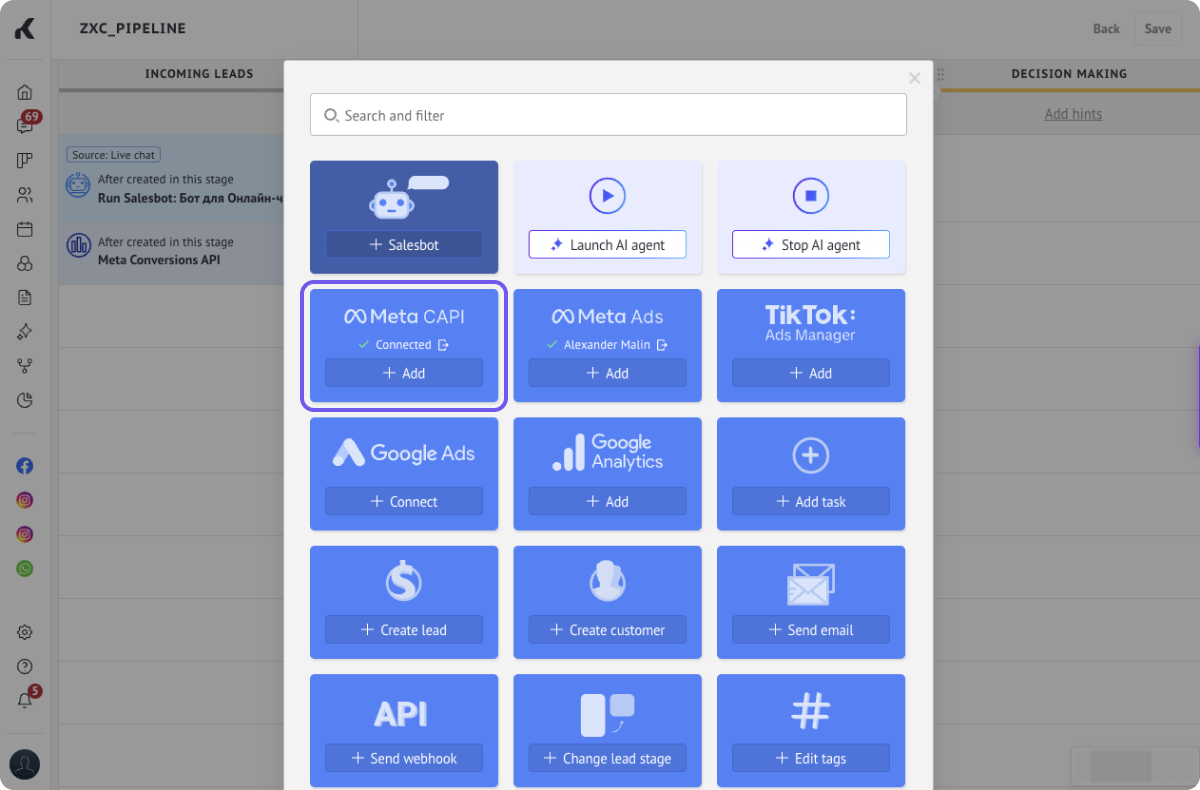
Find Meta CAPI.
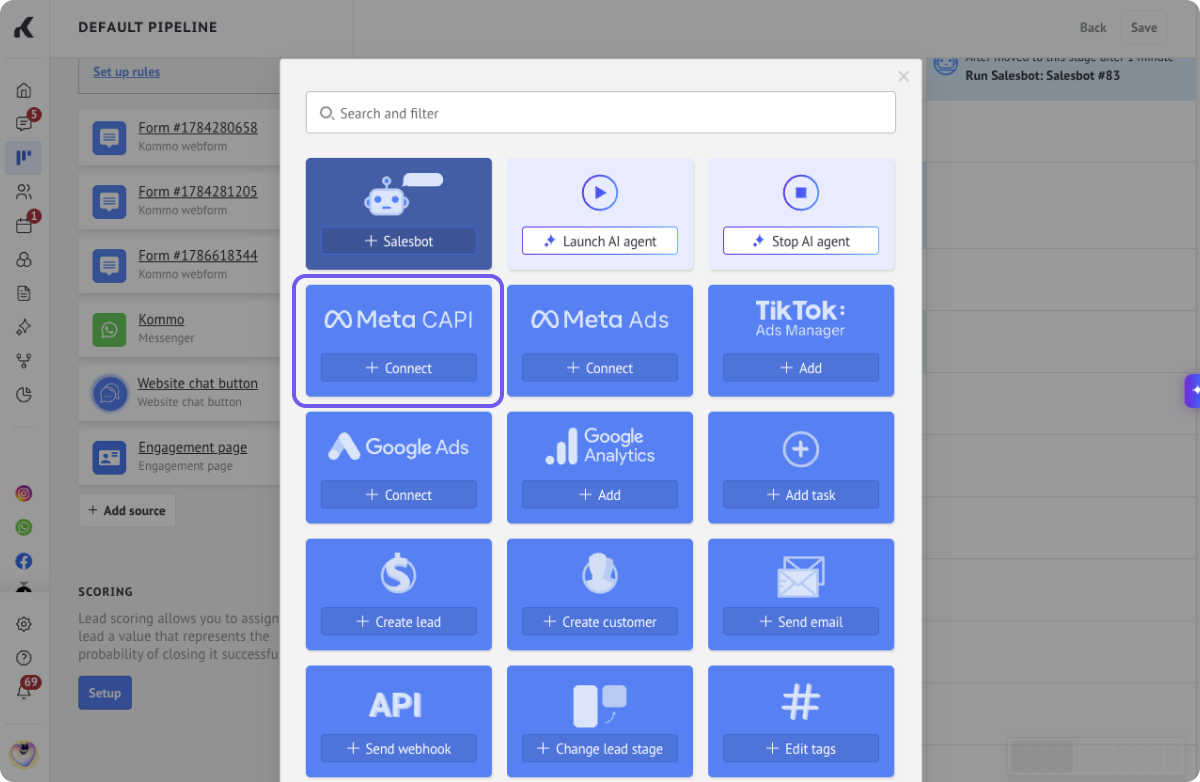
If the card shows + Connect, click it and complete section 3 below. If it shows Connected, click + Add to open the trigger settings, then continue to section 4.
Open CAPI through Salesbot
Go to Settings > Communication tools.
In the Salesbots section, create a bot or open an existing one. For help with the builder, see Create a Salesbot in Kommo.
At the point where the outcome has been confirmed, select Action.
Select Meta Conversions API.
If a warning asks you to connect Facebook, click Facebook and complete section 3 below. If CAPI is already authorized, continue to section 4.
3. Connect your Meta account
Complete this section when Kommo prompts you to connect. If CAPI is already authorized, continue to section 4.
In the Meta authorization tab, sign in to Facebook if prompted.
Select the business portfolio you want to connect, then click Continue.
Review the connection and click Continue.
Select the Facebook Pages Kommo should access, then click Continue.
Select the Instagram Accounts Kommo should access, then click Continue.
Confirm the selected accounts and review the requested permissions.
Click Save, then Got it on the confirmation screen.
Return to Kommo. For pipeline automation, click + Add on the connected Meta CAPI card to open the trigger settings. For Salesbot, return to the Meta Conversions API action in the builder.
Note: For WhatsApp, the Meta account used to authorize CAPI must have access to the WhatsApp Business Account (WABA) that owns your number. WhatsApp events use that account’s dataset independently of the Facebook Page.
4. Select your messaging sources
A source is a Facebook Page, Instagram account, or WhatsApp number. Selecting sources tells Kommo which messaging profiles it should use when sending events.
Your method | What to select |
|---|---|
Pipeline automation | Open Sources and select the sources the trigger should use. No sources are selected by default. |
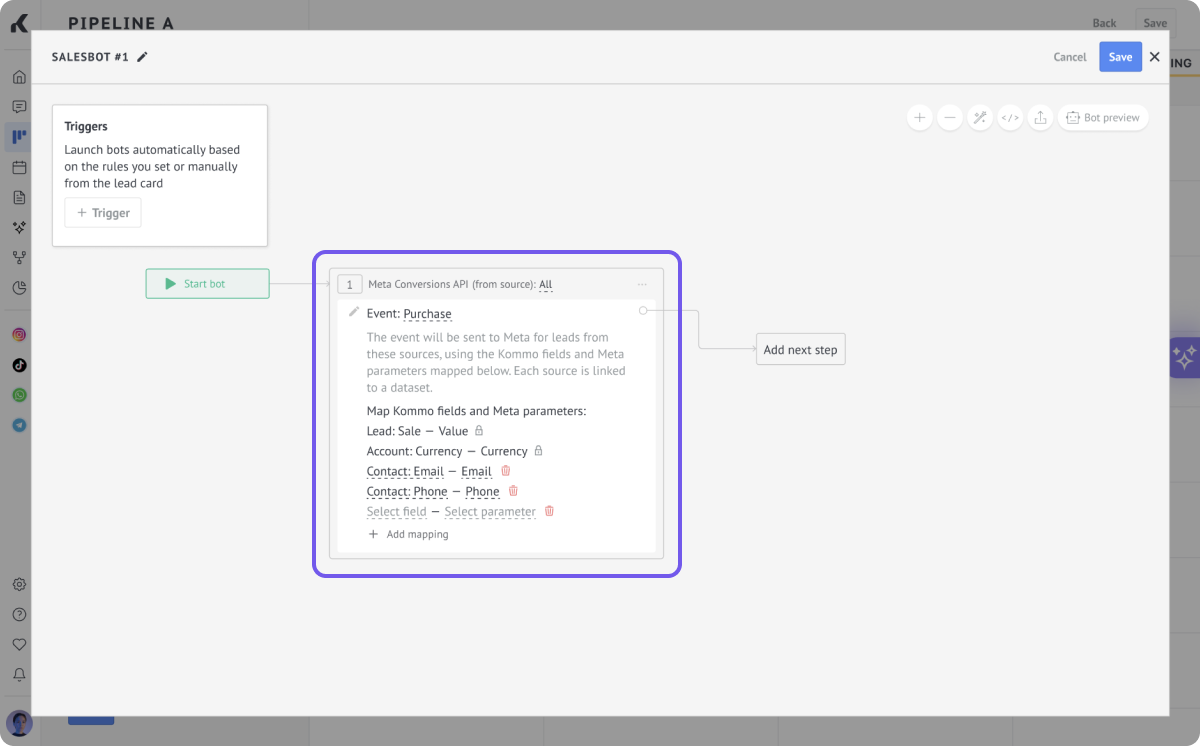
Salesbot | Open Meta Conversions API (from source). All is selected by default. Clear any sources you do not want this action to use. |
You can include several Facebook Pages, Instagram accounts, or WhatsApp numbers in one trigger or action.
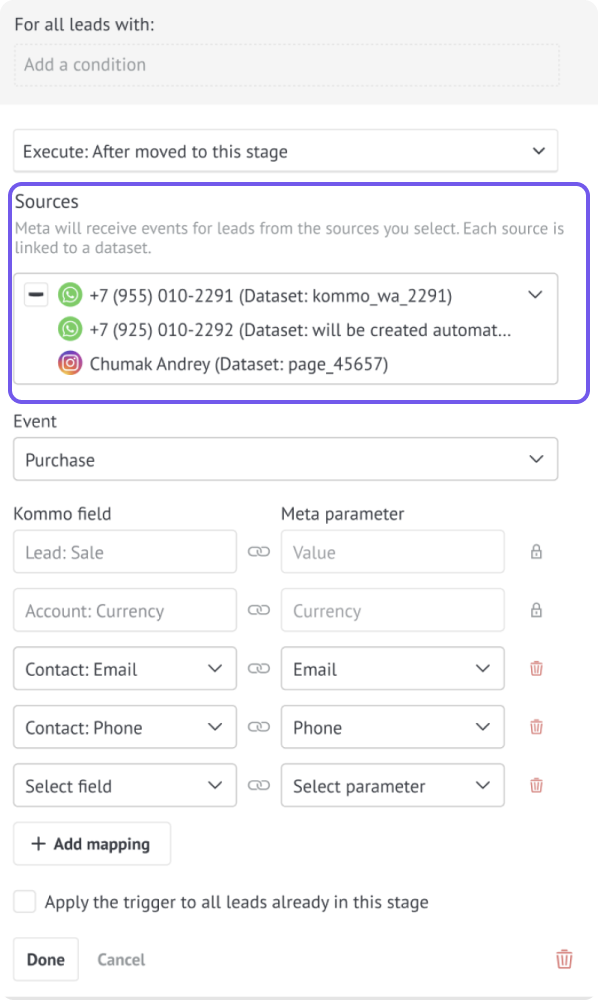
To include WhatsApp, make sure WhatsApp Business is connected to Kommo first. If a number is unavailable, check that the integration is connected and that the Meta account used for CAPI has access to its WABA.
Each source sends events to its corresponding Meta dataset, where Meta receives and organizes them. If no dataset is linked, Kommo creates one named after the source. You cannot select a dataset separately.
When the automation runs, Kommo checks the lead’s primary contact for messaging profiles from the selected sources. If several profiles qualify, it can send an event for each profile to its corresponding dataset.
5. Choose the event to send
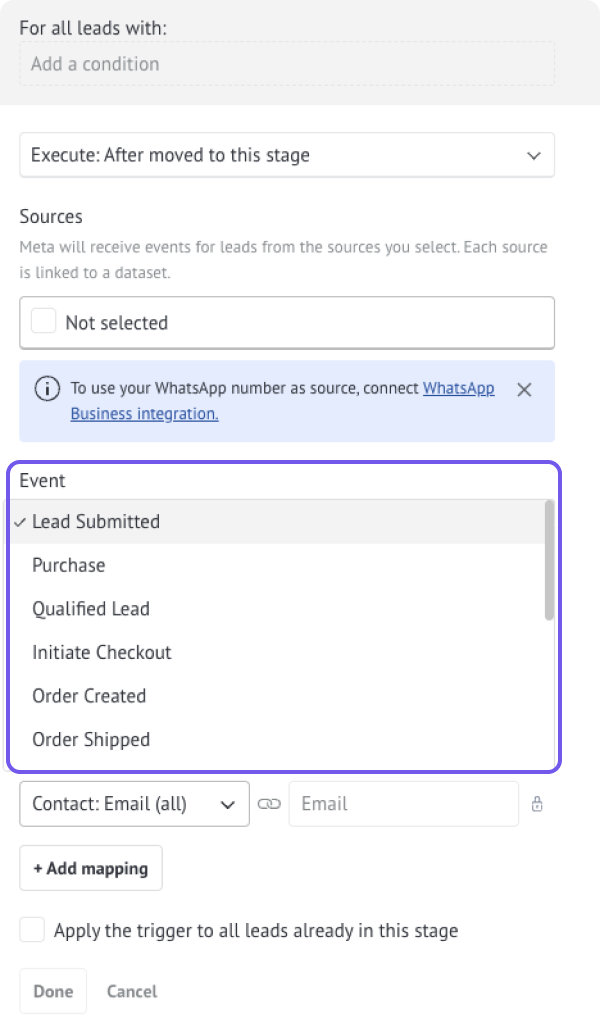
In the Event dropdown, select the outcome you want to report. Purchase is selected by default, so change it if you want to report a different outcome.
What happened | Select this event |
|---|---|
A person submits their details or inquires about your product or service | Lead Submitted |
A customer completes a transaction | Purchase |
A lead meets your qualification criteria | Qualified Lead |
A customer starts the checkout process | Initiate Checkout |
An order is placed, but payment is not yet confirmed | Order Created |
An order is shipped to the customer | Order Shipped |
An order reaches the customer | Order Delivered |
An order is canceled | Order Canceled |
A customer returns an order | Order Returned |
A customer adds a product to their cart | Add To Cart |
A customer views a product or service | View Content |
A customer leaves items in their cart without completing the purchase | Cart Abandoned |
A customer gives a rating, such as a star score | Rating Provided |
A customer writes a review | Review Provided |
Important: The event name describes what you are reporting. It does not make Kommo detect the outcome. For example, selecting Purchase does not confirm that the customer paid.
For all 14 supported events, see Choose the outcomes you want to report in the overview.
6. Check the data sent with the event
The same data settings apply to pipeline triggers and Salesbot actions.
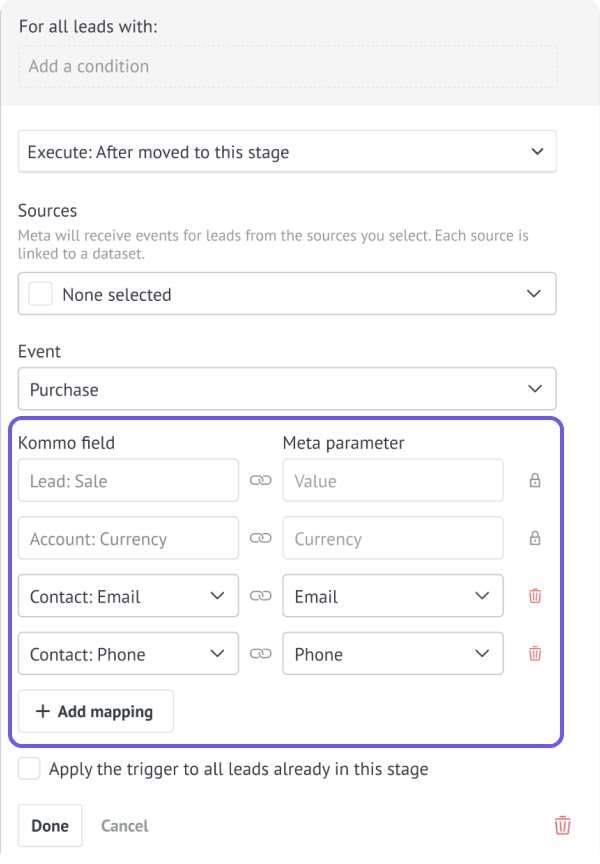
Review the default field mappings
A field mapping tells Kommo which field to read and which Meta parameter should receive its value. For example, Lead: Sale → Value sends the amount in the lead’s Sale field as the purchase value.
The settings start with these four pairs:
Kommo field | Meta parameter |
|---|---|
Lead: Sale | Value |
Lead: Currency | Currency |
Contact: Email (all) | |
Contact: Phone (all) | Phone |
The Sale → Value and Currency → Currency mappings supply the transaction amount and currency. Kommo sends all phone numbers and email addresses of the primary contact with every event.
Note: The four default mapping pairs cannot be deleted. You can change the Kommo field that supplies the data for each predefined Meta parameter.
Fill in the required purchase and order data
Before the trigger or Salesbot action runs:
Purchase: Provide both the final purchase value and currency. With the default mappings, enter the final amount in the lead’s Sale field.
Order Created and Order Shipped: Provide currency.
Check the currency shown next to the lead’s Sale amount. If it is missing or incorrect, ask your Kommo admin to review the workspace currency in Settings > Workspace settings > General settings. See Manage workspace settings.
If you change a default mapping, check that the field you selected contains the intended value before the event is sent.
Add extra data with an optional mapping
Click + Add mapping.
Select the Kommo field containing the information.
Select the corresponding Meta parameter.
Repeat for any other data you want to include.
Only compatible field and parameter types are available for pairing. To remove a custom mapping, click the delete icon beside its row.
Make sure every mapped field contains the intended information before the event is sent.
7. Set the execution conditions and save
Finish with the instructions for your chosen method.
Save the pipeline trigger
Open Execute and choose when the trigger should run. For example, After moved to this stage runs it when a lead enters the selected stage.
To limit it to certain leads, click Add a condition under For all leads with and configure the filter. Leave this area empty if you do not need an additional filter.
Choose whether to apply the trigger to leads already in the stage. Select the checkbox to include them, or leave it unchecked to exclude them from this initial application.
Click Done to close the trigger settings.
Click Save at the top of the pipeline automation page to apply the changes.
Before including existing leads, check that the event accurately represents their outcome and that the required fields are filled in.
Sources controls which messaging accounts the trigger uses. For all leads with adds conditions the lead must meet. These settings serve different purposes.
The trigger is now configured. Kommo sends the selected event when an eligible lead meets its execution conditions. Leaving the existing-leads checkbox unchecked does not stop future runs when leads meet those conditions.
For more about execution triggers and filters, see Set up digital pipeline triggers.
Save the Salesbot
Check that the CAPI action follows the steps that confirm the outcome. For Purchase, payment must already be confirmed and the required information recorded.
Click Save & Continue.
In the Execution condition window, choose when Salesbot should start and which leads it should run for.
Click Done.
After the confirmation appears, the bot is available in the Salesbots list.
The execution conditions decide when the bot starts. The position of the CAPI action decides when the event is sent during the flow.
8. Check that Meta received the event
Important: Kommo’s CAPI integration has no test mode. Any event sent while checking setup is a real event. Use a lead whose actual outcome matches the selected event.
Open an eligible lead from one of your selected messaging sources.
Check that its primary contact has the relevant messaging profile. For WhatsApp, the lead must have come from a Click-to-WhatsApp ad.
Fill in the event’s required fields and any additional mapped fields.
Run your configured flow. For pipeline automation, meet the trigger’s execution condition, such as moving the lead to the selected stage. For Salesbot, start it through its configured condition and complete the flow until it reaches the CAPI action.
Check the lead feed for the sending result and destination dataset.
Open Meta Events Manager and check that dataset for the event.
Delivery can take up to 30 minutes, and the dataset display can take up to a day to update.
If the event is missing, check that the messaging integration remains connected, the correct source is selected, the automation ran, the primary contact has an eligible messaging profile, and the required data is filled in. For WhatsApp, also confirm the lead came from a Click-to-WhatsApp ad.
Seeing the event in Events Manager confirms that Meta received it. Check Meta Ads Manager separately to see whether Meta attributed it to an ad.
For missing events, rejected data, or attribution issues, see Troubleshoot Meta Conversions API.